Here is a big, warm, and encouraging response crafted as a complete recipe blog post, dedicated to your nephew and his fantastic baking achievement.
—
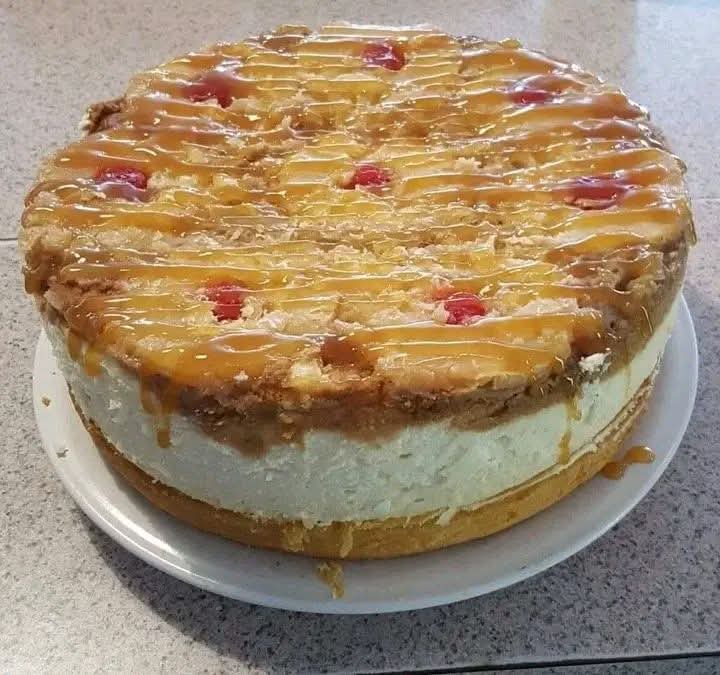
A Star Baker is Born: Celebrating with a Pineapple Upside-Down Cheesecake
There is something truly special about a 14-year-old who chooses to spend his time in the kitchen, creating something as delightful and from-scratch as a Pineapple Upside-Down Cheesecake. It’s a bold choice, combining the nostalgic, sticky-sweet charm of a classic upside-down cake with the rich, creamy elegance of a cheesecake. It shows creativity, patience, and a real passion for the craft of baking.
So, to the birthday boy who made his own cake: Happy 14th Birthday! You should be incredibly proud of yourself. This cake is a showstopper, and the fact that you pulled it together at your age is more impressive than you know. We’re all just thrilled to see the next generation of bakers firing up their ovens. Keep experimenting, keep learning, and most importantly, keep having fun with it. The baking community is cheering you on! And to the proud aunt or mom who shared this? Thank you for encouraging him. Now, let’s dive into the masterpiece.
This recipe takes your brilliant idea and scales it up, providing a detailed guide for anyone who wants to recreate this show-stopping dessert. It’s a journey through texture and flavor, and we’re so glad you’re leading the way.
—
The History of a Classic Combination
The original Pineapple Upside-Down Cake became a sensation in the mid-20th century, largely thanks to the marketing of canned pineapple by the Dole Company. It was a time when convenience foods were new and exciting. The magic of the cake was (and still is) in the reveal—flipping the pan to show a beautiful, glazed fruit topping.
Cheesecake, on the other hand, is an ancient dessert, with roots tracing back to ancient Greece. It evolved through the centuries into the dense, creamy, and beloved dessert we know today.
Combining these two is a brilliant, modern twist. It takes the best of both worlds: the nostalgic, caramelized pineapple and cherry topping meets the rich, velvety smoothness of a classic cheesecake. It’s a dessert that honors the past while creating something entirely new and exciting.
—
The Big Recipe: Pineapple Upside-Down Cheesecake
This recipe is designed for a 9-inch springform pan. The “upside-down” part is built right into the crust and topping!
Introduction: A Slice of Sunshine
Imagine a buttery, brown sugar-crusted base, studded with bright maraschino cherries and topped with a perfectly caramelized ring of pineapple. Now, imagine that golden topping giving way to a thick, luscious layer of creamy cheesecake. That is what we are creating today. It’s a dessert that’s both impressive and comforting, perfect for a birthday, a holiday, or any day you want to feel a little extra special.
Ingredients: The Building Blocks of Greatness
For the “Upside-Down” Topping (which becomes the bottom):
· 5 Tbsp unsalted butter, melted
· ½ cup packed light brown sugar
· 2 cans (8 oz each) pineapple slices in juice, well-drained (you’ll need about 7-8 slices)
· 7 maraschino cherries, stemmed, patted dry, and chopped in half
For the Graham Cracker Crust:
· 1 ½ cups graham cracker crumbs (about 12 full sheets)
· ¼ cup granulated sugar
· 6 Tbsp unsalted butter, melted
· Pinch of salt
For the Cream Cheese Filling:
· 3 packages (24 oz total) full-fat cream cheese, softened to room temperature
· 1 cup granulated sugar
· 3 large eggs, at room temperature
· 1 cup full-fat sour cream, at room temperature
· 1 Tbsp vanilla extract
· 1 Tbsp fresh lemon juice (optional, but brightens the flavor)
Instructions: The Method to the Magic
Step 1: Prepare the “Upside-Down” Layer
1. Preheat your oven to 350°F (175°C).
2. Prepare the pan: Brush the bottom and sides of a 9-inch springform pan generously with some of the melted butter. Pour the remaining 5 Tbsp of melted butter into the bottom of the pan. Sprinkle the brown sugar evenly over the melted butter.
3. Arrange the fruit: Place the well-drained pineapple slices in a single layer over the brown sugar. You’ll likely fit one in the center and then arrange the others around it, cutting some in half to fit if necessary. Place a cherry half (cut-side up) in the center of each pineapple ring and in any other gaps.
Step 2: Make the Crust
1. In a small bowl, combine the graham cracker crumbs, ¼ cup sugar, and a pinch of salt.
2. Pour in the 6 Tbsp of melted butter and stir with a fork until the mixture is fully moistened and looks like wet sand.
3. Carefully spoon the crust mixture over the arranged pineapple and cherries. Using your fingers or the bottom of a measuring cup, gently press the crumbs into an even, firm layer. Be careful not to disturb the fruit pattern underneath.
Step 3: Make the Cheesecake Filling
1. In a large mixing bowl (or the bowl of a stand mixer with the paddle attachment), beat the softened cream cheese on medium speed until completely smooth and creamy, with no lumps.
2. Gradually add the 1 cup of sugar and beat until well combined. Scrape down the sides and bottom of the bowl with a spatula.
3. Add the eggs one at a time, beating on low speed just until each yolk disappears into the batter. Do not overmix! Overmixing incorporates too much air and can cause the cheesecake to crack.
4. Add the sour cream, vanilla extract, and lemon juice (if using). Mix on low speed until just combined and smooth. Give the bowl one last thorough scrape to ensure everything is incorporated.
Step 4: Assemble and Bake
1. Pour the cheesecake filling over the crust in the springform pan. Spread it gently and evenly with a spatula.
2. Place the springform pan on a large baking sheet (to catch any potential butter leaks).
3. Bake for 55-70 minutes. The cheesecake is done when the edges are set and puffed slightly, but the center 2-3 inches still have a slight jiggle when you gently shake the pan.
4. Turn the oven off, crack the door open, and let the cheesecake rest in the warm oven for 1 hour. This helps prevent cracking.
5. Remove from the oven and run a thin knife around the very edge of the cake to loosen it from the pan (this also helps prevent cracking as it cools). Let it cool completely on a wire rack.
6. Once cool, cover the pan tightly with plastic wrap and refrigerate for at least 6 hours, but preferably overnight. This is essential for the perfect texture.
Step 5: The Grand Reveal
1. When you’re ready to serve, remove the sides of the springform pan.
2. Place a large, flat serving plate or cake stand upside-down over the top of the cheesecake.
3. With a confident, steady motion, hold the plate and the pan bottom together tightly and flip the entire thing over. The bottom of the pan is now on top.
4. Gently lift the springform pan base away. Admire your beautiful work! If any pineapple or cherries have stuck, simply nudge them back into place.
5. Slice, serve, and watch the smiles appear.
Formation & The Science of Success
The beauty of this cake lies in its construction. The layers are strategically built in reverse. The butter and brown sugar melt during baking, creating a rich caramel sauce that soaks into the bottom of the crust and candies the fruit. When you flip the cake, this caramelized layer becomes a gorgeous, glossy topping. The cheesecake, with its high-fat content from the cream cheese and sour cream, provides a dense, velvety canvas that perfectly balances the sweet, sticky fruit topping. The key is patience—allowing the cheesecake to cool and set completely ensures clean slices and the perfect texture.
Nutritional Information (Per Slice, based on 12 slices)
· Calories: ~450-500
· Fat: ~28g
· Carbohydrates: ~45g
· Protein: ~7g
(Note: This is an estimate and a dessert to be enjoyed as a delightful treat!)
Benefits (Beyond the Plate)
· Mood Booster: The combination of sweet, creamy, and tangy flavors is scientifically proven to release endorphins.
· Confidence Builder: For a young baker, successfully creating a complex cake like this is an incredible achievement that builds lifelong skills and self-esteem.
· Connection: Desserts like this bring people together. It turns a simple birthday into a memorable celebration centered around a homemade labor of love.
Lovers of this Dessert
This cake is for everyone:
· Classic Dessert Lovers: It appeals to those who adore the nostalgic flavors of a pineapple upside-down cake.
· Cheesecake Aficionados: It offers the rich, dense texture that cheesecake fans crave.
· Adventurous Eaters: It’s a fun, surprising twist on two well-known desserts.
· Proud Families: It’s a cake made by a loved one, which makes it taste infinitely better.
Conclusion: A Standing Ovation
To the 14-year-old baker who inspired this entire post: you have outdone yourself. This Pineapple Upside-Down Cheesecake is a testament to your talent and courage in the kitchen. We hope it was the sweetest centerpiece for a wonderful birthday celebration.
Keep baking, keep sharing, and never stop creating. The world always needs more people who can make something beautiful out of simple ingredients like butter, sugar, and a whole lot of heart. Happy Birthday! 🎂🎉