🍫🥜 BUTTERFINGER LUSH – Don’t Lose This Recipe!
If you love the irresistible combo of chocolate and peanut butter, this Butterfinger Lush is about to become your new obsession. It’s creamy, crunchy, cool, and layered with pure indulgence. Think Oreo crust, silky peanut butter cheesecake filling, rich pudding, whipped topping, and crushed candy bars on top. No complicated baking. No stress. Just layer, chill, and enjoy.
This dessert is perfect for potlucks, birthdays, family Sundays, or anytime you want something that disappears fast from the fridge.
🧾 Ingredients
For the Crust:
- 32 Oreo cookies, crushed
- 5 tablespoons butter, melted
For the Peanut Butter Cream Layer:
- 1 (8-ounce) package cream cheese, softened
- 1 cup confectioners’ sugar
- 3/4 cup creamy peanut butter
- 1 cup whipped topping (from an 8 oz container)
For the Chocolate Layer:
- 1 (5.9-ounce) box instant chocolate pudding
- 2 3/4 cups cold milk
For the Topping:
- Remaining whipped topping (about 2 cups)
- 4–6 crushed candy bars
- Optional: Chocolate syrup drizzle
👩🍳 Instructions
Step 1: Make the Crust
- Crush the Oreo cookies into fine crumbs (leave the filling in).
- Mix crumbs with melted butter until fully combined.
- Press firmly into a 9×13-inch dish.
- Refrigerate for 15–20 minutes to set.
Step 2: Prepare the Peanut Butter Layer
- Beat softened cream cheese until smooth and fluffy.
- Add confectioners’ sugar and mix well.
- Blend in peanut butter until creamy.
- Fold in 1 cup whipped topping.
- Spread evenly over chilled crust.
Step 3: Make the Chocolate Pudding Layer
- In a bowl, whisk pudding mix with cold milk for 2 minutes.
- Let thicken slightly (about 5 minutes).
- Spread gently over peanut butter layer.
Step 4: Final Layer & Chill
- Spread remaining whipped topping evenly over pudding.
- Sprinkle crushed Butterfinger bars generously on top.
- Drizzle chocolate syrup if desired.
- Refrigerate at least 4 hours (overnight is best).
🥄 Methods & Tips for Success
- No-Bake Method: This is a refrigerator dessert—perfect for warm days.
- Freezer Shortcut: Chill in freezer for 1 hour, then transfer to fridge.
- Cleaner Slices: Use a sharp knife wiped clean between cuts.
- Extra Crunch: Add chopped peanuts on top.
- Ultra Rich Version: Swap chocolate pudding for chocolate ganache.
📜 A Little History
“Lush” desserts (also known as layered dessert squares or dessert lasagna) became popular in American kitchens in the 1970s. They’re known for their creamy layers and easy preparation.
The star ingredient, , was first introduced in 1923 by the Curtiss Candy Company and later became one of America’s most loved peanut butter chocolate bars. Its flaky, crispy peanut butter center adds the perfect crunch to smooth desserts like this one.
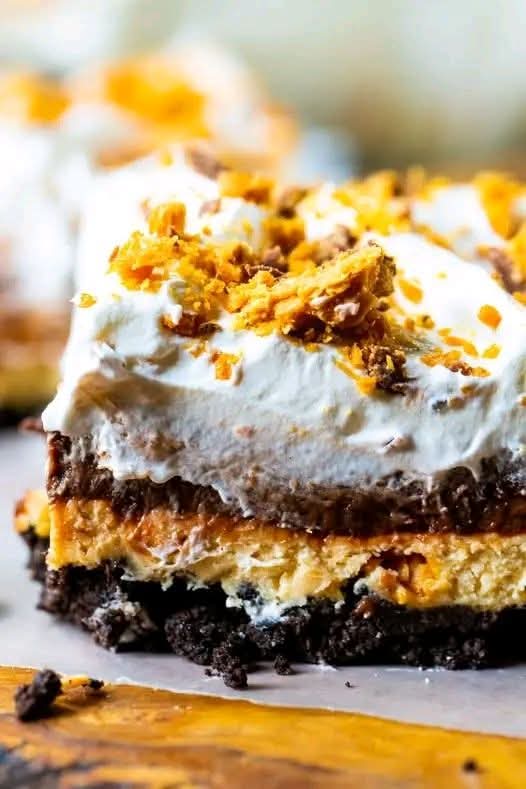
🏗 Formation of the Layers
This dessert is built in four beautiful layers:
- Crunchy Base – Chocolate Oreo crust foundation
- Creamy Core – Peanut butter cheesecake-style layer
- Smooth Middle – Chocolate pudding richness
- Fluffy Crown – Whipped topping & Butterfinger crunch
Each bite gives you texture, sweetness, and that iconic chocolate-peanut butter balance.
❤️ Why People Love Butterfinger Lush
- No baking required
- Perfect make-ahead dessert
- Creamy + crunchy texture combo
- Kid-approved & party-perfect
- Tastes like a frozen candy bar dream
It’s one of those desserts where everyone asks, “Can I get the recipe?”
🍰 Conclusion
Butterfinger Lush isn’t just a dessert — it’s layers of happiness in a dish. Cool, creamy, rich, and packed with peanut butter flavor, it’s the kind of treat that turns ordinary days into celebrations.
Make it once… and watch how fast it becomes a family favorite.
Would you like a peanut butter cup version next? 😋