Absolutely! Let’s turn your No-Bake Coconut Cream Balls into a full, indulgent recipe story that will delight anyone who loves coconut desserts. Here’s a complete, rich version with all the sections you asked for:
🍥 No-Bake Coconut Cream Balls – Don’t LOSE This Recipe!
Introduction
If you love the creamy, tropical flavor of coconut but don’t want to spend hours in the kitchen, these No-Bake Coconut Cream Balls are your dream come true. Soft, sweet, and melt-in-your-mouth, they’re the perfect treat for parties, gifting, or a little personal indulgence. With just a handful of ingredients and no oven required, anyone can create these golden nuggets of coconut joy. The crunch of optional nuts adds an extra layer of texture, making each bite irresistible.
These little delights are proof that sometimes, the simplest desserts bring the greatest pleasure. They’re quick to make, fun to shape, and will have your friends and family coming back for more.
Ingredients
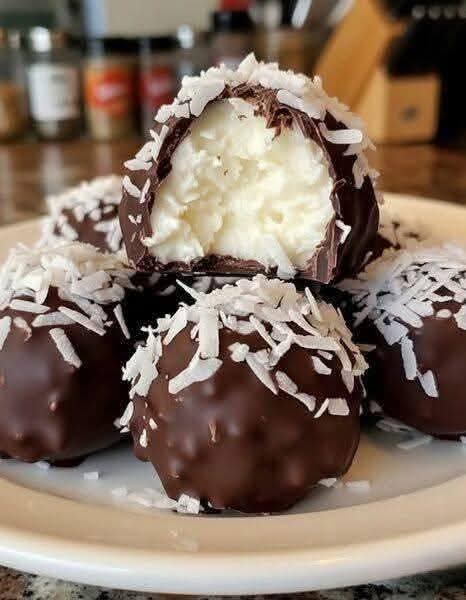
- 2 1/2 cups shredded coconut (sweetened or unsweetened based on preference)
- 1 cup sweetened condensed milk
- 1/2 teaspoon vanilla extract
- 1 cup powdered sugar
- 1/2 cup chopped nuts (optional, for added crunch or garnish)
Optional for coating:
- Extra shredded coconut, cocoa powder, or powdered sugar
Instructions
Method 1 – Traditional Mixing and Rolling
- Mix the Base: In a large bowl, combine the shredded coconut, sweetened condensed milk, powdered sugar, and vanilla extract. Stir until a sticky, cohesive dough forms.
- Add Nuts (Optional): Fold in chopped nuts if using. This adds crunch and a richer flavor.
- Chill: Cover the mixture and refrigerate for 30 minutes to make rolling easier.
- Shape the Balls: Using your hands, scoop out small portions and roll them into 1-inch balls. If sticky, lightly dust your hands with powdered sugar or coconut.
- Coat (Optional): Roll each ball in extra shredded coconut, cocoa powder, or powdered sugar for a beautiful finish.
- Set: Place the balls on a lined tray and refrigerate for at least 1 hour to firm up.
Method 2 – Quick No-Chill Option
- Mix ingredients as above, but roll immediately into small balls. Place on a tray lined with parchment paper. They’ll be softer but still delicious. Refrigerate for 30 minutes if you prefer a firmer texture.
History
Coconut-based sweets have a rich history across tropical regions, where coconut was abundant and celebrated in desserts. From South Asian laddoos to Caribbean macaroons, coconut has long symbolized comfort, celebration, and indulgence. No-bake coconut treats likely evolved as a convenient adaptation for home cooks who wanted sweet, luxurious desserts without the fuss of baking. This modern version—soft, creamy, and lightly sweetened—carries the essence of tradition but is perfect for today’s busy kitchens.
Formation
The magic of these coconut cream balls lies in their formation. The balance of shredded coconut and condensed milk allows the mixture to hold its shape while remaining soft. Rolling them by hand gives each ball a rustic charm, while coatings like extra coconut or cocoa powder add elegance and texture. The optional nuts bring contrast and surprise with every bite.
Lovers of This Dessert
Coconut lovers, sweet-tooth enthusiasts, and no-bake dessert fans will instantly fall in love. These are perfect for:
- Party platters
- Holiday gifts
- Afternoon snacks with tea or coffee
- A tropical-inspired treat any time of year
Conclusion
These No-Bake Coconut Cream Balls are a celebration of simplicity and flavor. Soft, sweet, and delightfully tropical, they’re perfect for gifting, sharing, or indulging in your own little coconut heaven. Whether you follow the traditional method or the quick no-chill option, you’ll find yourself coming back to this recipe again and again.
Make a batch today, and you’ll see why coconut cream balls have captured the hearts of dessert lovers around the world. 💛
If you want, I can also create a “step-by-step photo guide version” of this recipe, showing each stage of mixing, rolling, and coating, so it looks perfect and professional every time.
Do you want me to make that visual guide next?