☕🍰 Tiramisu Pudding Cups — Creamy, Dreamy & Irresistible!
If you love desserts like your favorite cakes (especially your Death by Chocolate Dump Cake 😉), these Tiramisu Pudding Cups will absolutely steal your heart! They combine the elegance of Italian tiramisu with the silky smoothness of pudding—served in adorable individual cups. No baking stress, just pure creamy indulgence layered with coffee-soaked goodness.
🌟 Introduction
Inspired by the classic Italian dessert , these pudding cups are a modern twist designed for simplicity and luxury. Instead of traditional mascarpone layers, we create a rich custard-style pudding that melts in your mouth.
Perfect for:
- Dinner parties 🍽️
- Romantic desserts ❤️
- Or just treating yourself after a long day
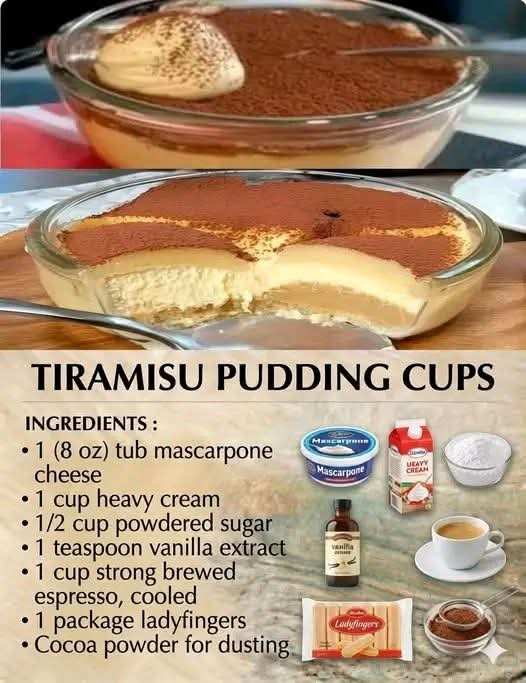
🛒 Ingredients (Serves 4–6)
For the Creamy Pudding:
- 6 large egg yolks
- ¾ cup white sugar
- 2/3 cup milk
- 1 ¼ cups heavy cream
- ½ teaspoon vanilla extract
For the Layers:
- 1 cup strong brewed coffee (cooled) ☕
- 2 tablespoons sugar (optional, for coffee)
- 20–24 ladyfinger biscuits (savoiardi)
- Unsweetened cocoa powder (for dusting)
- Dark chocolate shavings (optional 🍫)
🧑🍳 Instructions
Step 1: Make the Custard Base
- In a bowl, whisk egg yolks and sugar until pale and creamy.
- Heat milk gently in a saucepan (do not boil).
- Slowly pour warm milk into the egg mixture while whisking continuously.
- Return mixture to the pan and cook over low heat until thickened (custard consistency).
- Remove from heat, add vanilla extract, and let cool.
Step 2: Whip the Cream
- In a separate bowl, whip heavy cream until soft peaks form.
- Gently fold the whipped cream into the cooled custard.
👉 This creates that signature airy, silky texture.
Step 3: Prepare Coffee Dip
- Mix brewed coffee with sugar (if using).
- Quickly dip each ladyfinger into the coffee—don’t soak too long!
Step 4: Assemble the Cups
- Add a layer of soaked ladyfingers at the bottom.
- Spoon a layer of pudding cream.
- Repeat layers until cups are filled.
- Finish with cream on top.
Step 5: Chill & Finish
- Refrigerate for at least 4 hours (overnight is best!)
- Dust with cocoa powder and add chocolate shavings before serving
🍳 Methods & Tips for Success
- Tempering eggs: Always add warm milk slowly to avoid scrambling.
- Gentle folding: Keeps your pudding light and fluffy.
- Quick dipping: Ladyfingers should be moist, not soggy.
- Chilling time: Essential for flavor development!
📜 History of Tiramisu
The beloved originates from Italy, particularly the Veneto region in the 1960s. Its name means “pick me up”, thanks to the energizing combination of coffee and cocoa.
Traditionally made with mascarpone cheese, eggs, and espresso, this pudding version simplifies the process while keeping the soul of the dessert alive.
🧁 Formation (Texture & Layers)
Each spoonful delivers:
- Soft, coffee-soaked biscuit base ☕
- Velvety custard cream 🍮
- Light whipped texture 🌫️
- A hint of cocoa bitterness 🍫
The layers create a beautiful contrast—both visually and in taste!
❤️ Lovers of This Dessert
This recipe is perfect for:
- Coffee lovers ☕
- Creamy dessert fans 🍮
- Anyone who enjoys elegant but easy treats
- Families—kids love the mild sweetness too!
💡 Variations & Creative Methods
- Chocolate Tiramisu Cups: Add melted chocolate to the custard
- Fruit Twist: Add strawberries or raspberries 🍓
- No-Coffee Version: Use milk + cocoa instead
- Extra Rich: Add mascarpone for a traditional touch
🎉 Conclusion
These Tiramisu Pudding Cups are proof that you don’t need complicated steps to create something truly luxurious. Creamy, layered, and bursting with flavor—they’re a guaranteed crowd-pleaser.
Honestly, if you enjoy making your cloud cake twice a week, this might just become your next go-to dessert 😍
If you want, I can turn this into a no-egg version or a quick 10-minute tiramisu too!