Here is a comprehensive guide to creating delicious Homemade Turtle Candy, complete with all the sections you requested.
—
Introduction
There are few confections that achieve the perfect trifecta of textures and flavors quite like the Turtle. This classic candy brings together the rich, buttery crunch of toasted pecans, the soft, salty-sweet chew of caramel, and the smooth, bittersweet depth of semi-sweet chocolate. While the store-bought versions are tasty, nothing compares to making them fresh at home. This recipe will guide you through creating these elegant, bite-sized treats that look like they came from a gourmet chocolatier but are surprisingly simple to assemble. Whether you’re looking for a homemade gift, a holiday baking project, or just a special weekend indulgence, these Turtle candies are sure to impress.
—
History
The Turtle is a true American classic, with its origins dating back to the early 20th century. The candy was invented by the Chicago-based DeMet’s Candy Company in the 1910s. The story goes that a salesman for the company, while on the road, would create the candies by hand, forming clusters of pecans, adding a caramel center, and dipping them in chocolate. The name “Turtle” was coined because the finished product, with its pecan “legs” peeking out from under the chocolate, resembled a small turtle. DeMet’s trademarked the name in the 1920s, and the candy quickly became a beloved staple across the United States. Today, the “Turtle” has inspired countless variations, from cheesecakes and brownies to coffee drinks, but the original cluster remains a timeless favorite.
—
Benefits
While this is undoubtedly a treat to be enjoyed in moderation, making them from scratch offers several benefits:
· Quality Control: You choose the ingredients—high-quality chocolate, real caramel, and fresh pecans—avoiding the preservatives and artificial flavors often found in mass-produced candies.
· Customization: You can tailor the recipe to your taste. Prefer dark chocolate? Use it. Love a flaky sea salt? Sprinkle some on top. You are in complete control.
· A Sense of Accomplishment: There is a special pride that comes from creating beautiful, delicious confections with your own hands. It’s a rewarding culinary project.
· Perfect for Gifting: Homemade candies make for a thoughtful, heartfelt gift for friends, family, or neighbors during the holidays or for any special occasion.
—
Ingredients (The Big Recipe)
This recipe yields approximately 32-36 turtle candies.
· For the Base:
· 64 Pecan halves (about 2 heaping cups)
· For the Caramel Layer:
· 11 oz. package of soft baking caramels (such as Kraft Caramels)
· 2 tablespoons heavy cream or whole milk
· Pinch of flaky sea salt (optional, but highly recommended)
· For the Chocolate Coating:
· 1 bag (approx. 11-12 oz.) semi-sweet chocolate chips (or high-quality chocolate bars, chopped)
· 1 tablespoon coconut oil or shortening (optional, helps thin the chocolate for a smoother coating)
—
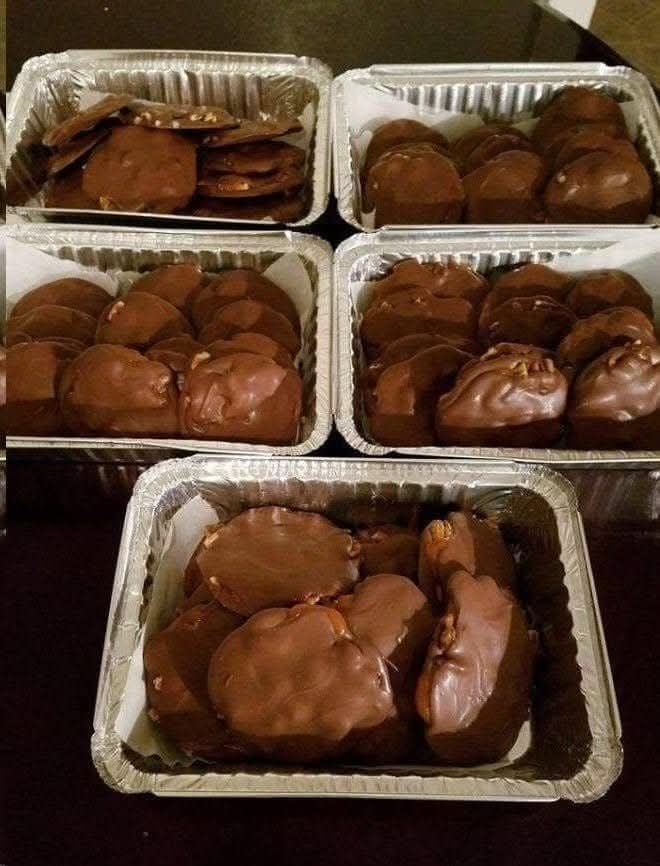
Methods & Formation (Step-by-Step Instructions)
Method 1: Preparation and Forming the Clusters
1. Prep Your Workspace: Line a large baking sheet with parchment paper or a silicone baking mat. This is essential for easy release.
2. Form the “Turtle” Base: Arrange the pecan halves on the prepared baking sheet in small clusters. Each cluster should have 4 pecans, arranged like four legs, with the flat sides down and the tips meeting in the center. This creates a little “nest” for the caramel. Leave about an inch of space between each cluster.
3. Toast (Optional but Recommended): For deeper flavor, you can toast the pecan clusters in a preheated 350°F (175°C) oven for 5-7 minutes, just until fragrant. Let them cool completely on the sheet before adding caramel.
Method 2: The Caramel Center
1. Unwrap Caramels: This is the most tedious step! Unwrap all the caramels and place them in a microwave-safe bowl with the 2 tablespoons of heavy cream.
2. Melt the Caramel: Microwave the mixture in 30-second intervals, stirring vigorously with a fork or small whisk after each interval. This prevents scorching. Continue until the caramel is completely smooth and melted. Stir in the optional pinch of flaky sea salt.
3. Assemble: Working quickly but carefully (the caramel will be hot!), use a small spoon or a teaspoon measure to drizzle a small dollop of melted caramel (about 1 heaping teaspoon) into the center of each pecan cluster. Try to keep it contained within the pecans.
4. Set the Caramel: Allow the caramel to cool and firm up completely at room temperature. You can speed this up by placing the baking sheet in the refrigerator for about 20-30 minutes.
Method 3: The Chocolate Coating
1. Melt the Chocolate: Once the caramel is firm, it’s time for the chocolate. Place the semi-sweet chocolate chips in a dry, microwave-safe bowl. If using, add the coconut oil or shortening to help thin the chocolate. Microwave in 30-second intervals, stirring thoroughly after each, until the chocolate is smooth and glossy. Be careful not to overheat, or the chocolate will seize.
2. Coat the Candies: There are two ways to do this:
· Dipping: Using two forks or a dipping tool, gently drop a caramel-nut cluster into the melted chocolate. Turn it to coat completely, then lift it out, allowing the excess chocolate to drip back into the bowl. Gently place it back on the parchment paper.
· Spooning: For a more rustic look, simply spoon the melted chocolate over each caramel-nut cluster, ensuring it covers the caramel and most of the pecans.
3. The Signature Finish: Before the chocolate sets, if you have any pecan halves left, you can gently press one on top of each candy for decoration. A final sprinkle of flaky sea salt at this stage is also divine.
Method 4: Setting and Storage
1. Let Them Set: Allow the finished candies to sit at room temperature until the chocolate is completely firm. If your kitchen is warm, you can place them in the refrigerator to set more quickly.
2. Store Properly: Once set, store the Turtle candies in an airtight container in the refrigerator for up to two weeks. Separate layers with parchment or wax paper.
—
Nutrition
Please note that this is an approximate estimation and will vary based on the specific brands and quantities used. Values are per candy (based on a recipe yield of 34).
· Calories: ~130-160 kcal
· Fat: ~8-10g
· Carbohydrates: ~14-18g
· Protein: ~1-2g
· Sugar: ~12-15g
—
Lovers (Who Will Enjoy This Candy?)
· The Classic Dessert Lover: Anyone who appreciates the timeless combination of chocolate, caramel, and nuts.
· The DIY Gift-Giver: Perfect for creating beautiful, heartfelt presents for teachers, neighbors, and hosts.
· The Holiday Baker: A staple for Christmas cookie and candy platters.
· The Texture Enthusiast: People who love the contrast between the crunchy pecan, the chewy caramel, and the smooth chocolate.
· The Salted-Sweet Fanatic: With the addition of flaky sea salt, this candy is an absolute dream for those who love the sweet-and-salty flavor profile.
—
Conclusion
Making Homemade Turtle Candy is more than just following a recipe; it’s an act of creating a small, beautiful piece of confectionery art. With just a handful of high-quality ingredients and a little patience, you can transform simple pecans, caramel, and chocolate into elegant, irresistible treats. The process is as enjoyable as the final product, filling your kitchen with the warm, comforting scents of toasting nuts and melting caramel. Whether you’re making them for a special occasion or simply to satisfy a sweet craving, these homemade turtles are guaranteed to become a cherished favorite. So, gather your ingredients and get ready to create something truly special. Enjoy every last bite