Here is a comprehensive guide to the “No-Knead Bread” recipe, crafted exactly as you requested, with all the sections you love. Get ready to fill your home with the most amazing aroma!
—
The Loaf That Changed My Kitchen: The Easiest & Cheapest Bread Recipe
There is a magic that happens in a kitchen when bread is baking. It’s an alchemy that transforms simple flour, water, and salt into a golden, crusty loaf with a soft, airy heart. For years, I thought this magic was reserved for professional bakers or grandmothers with decades of experience. I was intimidated by the kneading, the rising, the shaping—it felt like a science I could never master.
Then, I discovered the no-knead method, and everything changed. This recipe isn’t just easy; it’s a revelation. It proves that with patience (and very little effort), anyone can create bakery-quality bread at home. I stopped buying bread from the store because nothing compares to the taste, the texture, and the sheer satisfaction of pulling a loaf you made with your own two hands out of the oven. It contains no eggs, no butter, no milk—just four basic ingredients and time. It is, without a doubt, the easiest and cheapest way to make the best bread of your life.
A Brief History of “No-Knead”
While home bakers have been making simple bread for centuries, the specific “no-knead” method that went viral was popularized by Jim Lahey of Sullivan Street Bakery in New York City. In 2006, New York Times columnist Mark Bittman published Lahey’s recipe, and it took the world by storm. The brilliance of the method lies in its use of a very wet, high-hydration dough and an extremely long, slow fermentation. This process does the work that traditional kneading would do: it gently stretches and organizes the gluten proteins, creating a strong network that can trap the gases produced by the yeast. The result is a loaf with a wonderfully open crumb and a thick, crackly crust, all achieved with virtually no physical effort.
The Incredible Benefits of This Bread
· Wallet-Friendly: Made from flour, salt, water, and a tiny bit of yeast, this is arguably the cheapest bread you can make. A loaf costs pennies compared to artisanal bakery prices.
· No Special Skills Required: If you can stir ingredients in a bowl, you can make this bread. No kneading, no stand mixer needed.
· Simple, Clean Ingredients: You are in complete control. No preservatives, dough conditioners, or hidden sugars. It’s naturally vegan and dairy-free.
· Incredible Flavor: The long fermentation develops a deep, complex, slightly tangy flavor that you just can’t get from a same-day, kneaded loaf.
· Therapeutic & Rewarding: The process is slow and mindful. The feeling of sliding a perfect, golden loaf out of the oven is a joy that never gets old.
—
The Recipe: Your First No-Knead Loaf
This recipe yields one round, crusty loaf (boule).
Ingredients:
· 3 cups (400g) Bread Flour or All-Purpose Flour: Bread flour will give you a slightly chewier texture and better rise, but all-purpose works beautifully too.
· 1 ½ teaspoons (about 6g) Salt: Use fine sea salt or table salt. Avoid large, flaky kosher salt unless you grind it down, as it won’t distribute evenly.
· ½ teaspoon (about 2g) Instant Yeast: This is a very small amount! The long fermentation time means we don’t need much. Instant yeast can be mixed directly with the dry ingredients. If using active dry yeast, dissolve it in the water first.
· 1 ½ cups (350ml) Lukewarm Water: Tap water that feels just barely warm to the touch is perfect. Too hot and it can kill the yeast.
Instructions: The Method
Step 1: The Mix
In a large mixing bowl, whisk together the flour, salt, and instant yeast. Make sure they are evenly combined. Pour in the lukewarm water. Using a sturdy spatula or your hand, mix until all the flour is incorporated and you have a shaggy, sticky, and very wet dough. It will not look like a traditional, smooth dough ball. That’s exactly what you want.
Step 2: The Long Wait (First Rise)
Cover the bowl tightly with plastic wrap or a damp kitchen towel. Let it sit at room temperature (around 70°F/21°C) for 12 to 18 hours. This is the most important step. After this time, the surface of the dough should be dotted with bubbles and it will have doubled in size and look very loose and web-like. This long fermentation is what builds the flavor and the gluten structure.
Step 3: The Shape
Lightly flour your work surface and your hands. Scrape the dough out of the bowl onto the floured surface. It will be very sticky and wobbly. Using a dough scraper or your floured hands, gently lift the edges of the dough and fold them inwards towards the center. Do this 3-4 times to form a rough, round shape. Don’t overwork it; you just want to create some surface tension.
Step 4: The Second Wait (Proofing)
Generously flour a clean kitchen towel (not terry cloth, as it will stick) or a piece of parchment paper. Place the dough round seam-side down on the floured towel. Dust the top of the dough with more flour. Cover it with another towel or the edges of the parchment paper. Let it rise for another 1 to 2 hours. It will puff up but not necessarily double in size. When you gently poke it with a floured finger, the indent should slowly spring back halfway.
Step 5: The Hot Oven
About 30 minutes before the second rise is done, place a heavy, oven-safe pot with a lid (like a Dutch oven) into your oven and preheat it to 450°F (230°C). Getting the pot screaming hot is crucial for creating steam and a great crust.
Step 6: The Bake
Carefully remove the scorching hot pot from the oven and take off the lid. Using the floured towel or parchment paper, gently flip the dough into the hot pot, seam-side up. Be careful not to touch the sides of the pot. Give the pot a gentle shake to distribute the dough evenly. Put the lid back on and place it in the oven.
Bake for 30 minutes with the lid on. This traps the steam from the dough, creating a crispy, crackly crust. After 30 minutes, remove the lid and bake for another 10-15 minutes, until the loaf is a deep, golden brown and sounds hollow when you tap the bottom.
Step 7: The Final Act
Using a spatula or oven mitts, carefully lift the bread out of the pot and transfer it to a wire rack to cool completely. This is the hardest part! If you slice into it while it’s hot, the inside will be gummy. Let it cool for at least an hour. Then, slice, slather with butter (or not!), and experience the magic you created.
Nutritional Snapshot (Per Slice, based on 1 loaf/12 slices)
Note: This is an estimate and will vary based on exact ingredients.
· Calories: ~150
· Carbohydrates: ~30g
· Protein: ~5g
· Fat: <1g
· Fiber: ~1g
· Sodium: ~250mg
This bread is a source of complex carbohydrates for sustained energy, along with protein and a bit of fiber.
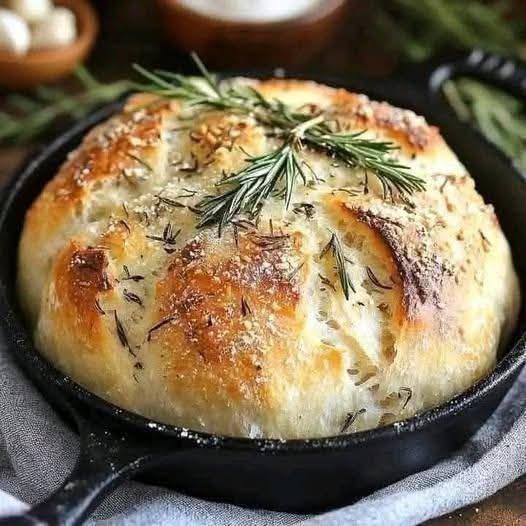
The Formation of the Perfect Loaf
The formation of this bread is a beautiful thing. The high hydration creates an open, irregular crumb—full of holes of different sizes, which is the hallmark of a great artisan loaf. The steam from the covered pot gelatinizes the outer layer of starch, which then hardens into a gloriously crackly, blistered crust. It’s a perfect contrast of textures: a rustic, hard exterior protecting a soft, chewy, and tender interior.
Conclusion: A Love Letter to Simple Bread
This recipe is more than just a way to avoid buying bread. It’s an invitation to slow down, to engage with a timeless process, and to connect with the simplest, most satisfying elements of cooking. It’s for the lovers of good food, the lovers of simplicity, and the lovers of that incomparable homemade aroma that fills every corner of your home.
Once you master this basic loaf, the possibilities are endless. You can add herbs, garlic, cheese, or olives during the first mix. You can experiment with different flours like whole wheat or rye. But for now, start here. Start with this magic. I promise, you’ll never look at a store-bought loaf the same way again. Happy baking, lovers of bread