Here’s a full, detailed guide to creamy, dreamy no-churn ice cream with multiple flavors, including history, methods, and tips for lovers of ice cream:
🍦 No-Churn Ice Cream: A Sweet Symphony of Flavors
No-churn ice cream is a game-changer in homemade frozen desserts. Traditional ice cream relies on an ice cream machine to churn and incorporate air while freezing, but no-churn recipes skip the machine entirely. The magic comes from whipping cream and combining it with sweetened condensed milk, which creates a luscious, airy texture that’s rich and creamy. Perfect for those who love ice cream but don’t want the fuss of machines!
Over time, no-churn ice cream has evolved into a canvas for endless flavors—from classic vanilla to whimsical cotton candy, seasonal pumpkin, or even fizzy soda-inspired creations like Dr Pepper ice cream. Its simplicity has made it a favorite for dessert lovers, home bakers, and families alike.
📝 Ingredients
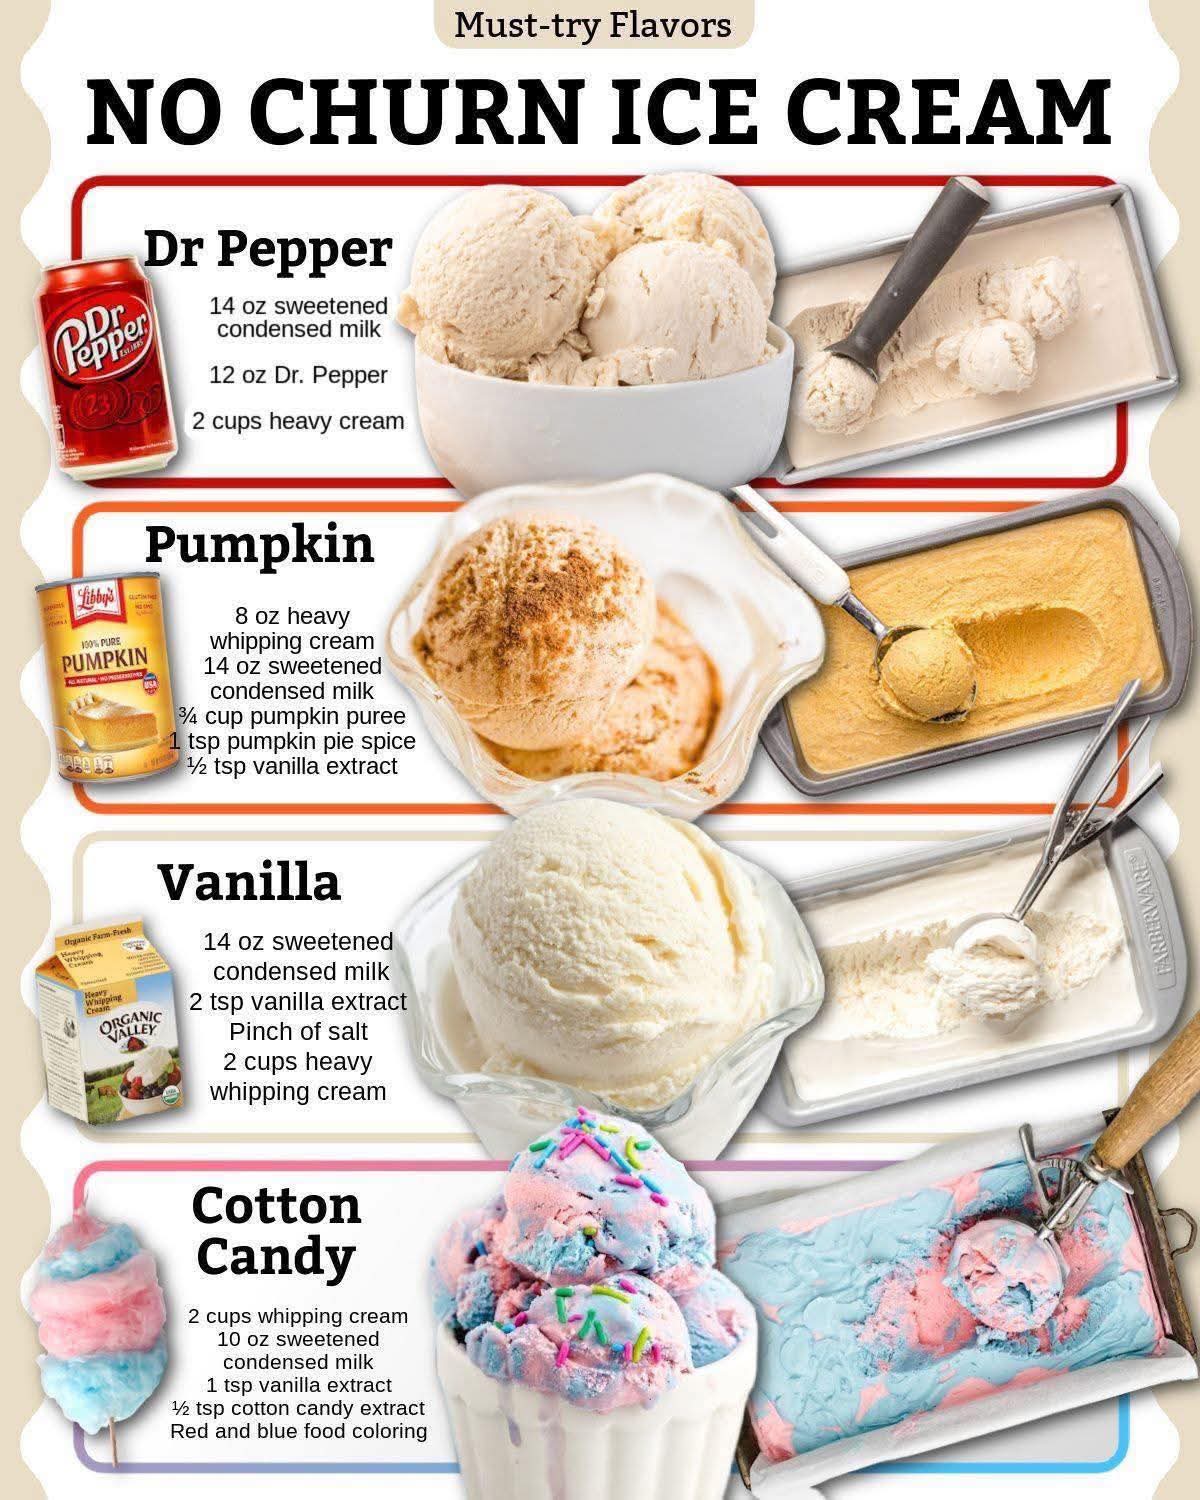
1. Dr Pepper Ice Cream
- 14 ounces sweetened condensed milk
- 12 ounces cold Dr Pepper
- 2 cups cold heavy cream
2. Pumpkin Ice Cream
- 8 ounces heavy whipping cream
- 14 ounces sweetened condensed milk
- ¾ cup pumpkin puree
- 1 teaspoon pumpkin pie spice
- ½ teaspoon vanilla extract
3. Vanilla Ice Cream
- 14 ounces sweetened condensed milk
- 2 teaspoons vanilla extract (or vanilla bean paste)
- 1 pinch salt
- 2 cups heavy whipping cream, chilled
4. Cotton Candy Ice Cream
- 2 cups heavy whipping cream (35% fat), chilled
- 10 ounces sweetened condensed milk, chilled
- 1 teaspoon vanilla extract
- ½ teaspoon cotton candy extract
- Red and blue food coloring
- Sprinkles (optional)
🍨 Instructions & Methods
Step 1: Prepare the Base
- Whip the Cream – In a large mixing bowl, whip cold heavy cream using an electric mixer until stiff peaks form. This adds air and creates the creamy texture.
- Mix Sweetened Condensed Milk – In a separate bowl, combine sweetened condensed milk with flavoring (vanilla, pumpkin puree, Dr Pepper, or cotton candy extract). Stir until smooth.
Step 2: Combine
- Gently fold the whipped cream into the flavored condensed milk mixture. Use a spatula and fold slowly to retain the airy texture. Over-mixing can deflate the mixture.
- For Dr Pepper ice cream, gently fold in the soda, being careful not to lose all the fizz.
Step 3: Flavoring & Coloring
- For pumpkin, add pumpkin pie spice and vanilla extract.
- For cotton candy, add food coloring and optional sprinkles to create a fun, swirled effect.
Step 4: Freeze
- Pour the mixture into a loaf pan or airtight container.
- Smooth the top with a spatula.
- Cover with plastic wrap or lid and freeze for 6–8 hours or overnight until firm.
Step 5: Serve
- Scoop into bowls or cones and enjoy!
- Optional toppings: chocolate sauce, caramel, fruit, nuts, or sprinkles.
🏛 History & Formation
No-churn ice cream is a modern adaptation of classic ice cream techniques. Traditional ice cream dates back to ancient China (using snow and milk) and Europe (16th–17th century frozen custards). The invention of sweetened condensed milk in the 19th century made ice cream easier to preserve and transport. By the 21st century, home cooks discovered that combining whipped cream with condensed milk could replicate the creamy texture of churned ice cream, giving birth to the no-churn craze we know today.
💕 Conclusion
No-churn ice cream proves that homemade desserts don’t need complex machinery to be indulgent. With a few simple ingredients, anyone can create rich, creamy ice cream at home in flavors that cater to every mood and season. Whether you’re a fan of fizzy Dr Pepper, seasonal pumpkin, classic vanilla, or playful cotton candy, this method brings creamy dreams to life with minimal effort.
🍨 Ice Cream Lovers’ Tips
- Texture – Use full-fat cream for the creamiest results.
- Flavor Boost – Infuse the cream with spices or extracts before whipping for a deeper taste.
- Swirls & Mix-Ins – Fold in chocolate chips, cookie chunks, or caramel ribbons before freezing.
- Storage – Keep in an airtight container to prevent ice crystals and maintain creaminess.
If you want, I can create a single giant recipe card with all four flavors side by side, showing exact ratios, prep times, and freezer tips — perfect for printing or saving for a dessert night.
Do you want me to make that?