Absolutely! Let’s make this Deep-Fried Marshmallows recipe fully indulgent, detailed, and festive — like a fairground treat in your own kitchen. Here’s a big, rich recipe complete with everything you asked for:
🍬 Deep-Fried Marshmallows — One Bite of Pure Fairground Magic
Introduction:
Imagine strolling through a bustling fairground: the scent of fried dough, the sounds of laughter, and suddenly — the crisp, golden bite of something warm and sweet, giving way to a soft, gooey center. That’s exactly what deep-fried marshmallows bring to your plate. A simple frozen marshmallow transforms into a decadent, crispy treat coated in light, fluffy batter. They’re quick to make, endlessly customizable, and perfect for delighting kids and adults alike. One bite and you’re transported straight to the carnival!
📋 Ingredients
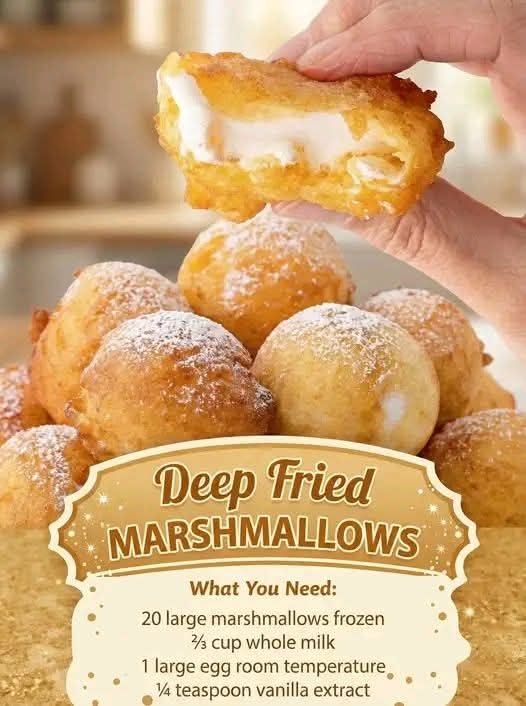
Main Ingredients:
- 20 large marshmallows, frozen
- ⅔ cup whole milk
- 1 large egg, room temperature
- ¼ tsp vanilla extract
- 1⅓ cups buttermilk pancake mix
- Canola oil, for deep frying
Optional Toppings:
- Powdered sugar, sifted
- Whipped cream
- Chocolate sauce
- Rainbow jimmie sprinkles
🥄 Instructions & Methods
Step 1: Prepare the Marshmallows
- Place the marshmallows on a tray and freeze for at least 2 hours or until completely solid.
Tip: Freezing prevents them from melting into a gooey mess during frying.
Step 2: Make the Batter
- In a medium mixing bowl, whisk together milk, egg, and vanilla extract until smooth.
- Gradually fold in the pancake mix to form a thick, smooth batter. The batter should cling to the marshmallows without sliding off.
Step 3: Heat the Oil
- Pour 2–3 inches of canola oil into a deep pot or fryer.
- Heat to 375°F (190°C). Use a candy thermometer for accuracy — too hot, and the batter burns; too cold, and it becomes soggy.
Step 4: Coat and Fry
- Dip each frozen marshmallow into the batter, fully coating it.
- Gently lower it into the hot oil using a slotted spoon. Fry 1–2 minutes, turning as needed, until golden brown and puffed.
- Remove and drain on paper towels. Repeat for all marshmallows.
Step 5: Serve
- Dust with powdered sugar.
- Add whipped cream, drizzle chocolate sauce, and sprinkle rainbow jimmies for that authentic carnival flair.
- Serve immediately — these are best enjoyed hot, when the center is gooey and the outside is crisp.
🏛 History & Formation
The concept of deep-fried treats is centuries old, dating back to fairs and carnivals in Europe, where sugar confections were often fried in oil for quick, indulgent snacks. Deep-fried marshmallows are a modern twist, likely emerging from the American state fair tradition in the 20th century. They combine two classic favorites: the iconic marshmallow and the irresistible allure of a fried dessert. The formation is simple: freeze to preserve structure, coat to protect, and fry to golden perfection.
💡 Conclusion
Deep-fried marshmallows are more than a snack — they are a moment of joy, a festival of textures and flavors in every bite. Crisp outside, soft inside, sweet, and fun, they’re a treat that sparks nostalgia and creates smiles instantly. Whether it’s a fairground revival at home or a playful dessert for friends, these marshmallows are guaranteed to be a showstopper.
❤️ For the Lovers of Sweets
If you adore chocolate, try dipping the fried marshmallows in hot fudge before serving. Peanut butter lovers can spread a tiny layer of peanut butter on the marshmallow before dipping in batter. For an extra indulgent twist, sprinkle crushed caramel candies or nuts on the hot marshmallow immediately after frying.
🔁 Methods with Lovers
- Chocolate Lover’s Version: Add cocoa powder to the pancake batter for a chocolate coating.
- Nutty Lover’s Version: Roll the hot marshmallows in crushed nuts or toffee.
- Fruity Twist: Serve with a drizzle of strawberry or raspberry sauce.
- Mini Version: Use smaller marshmallows for bite-sized treats perfect for parties.
🎡 Pro Tip: Serve straight from the fryer — the gooey center and crisp batter combination is fleeting but magical. One bite, and you’ll understand why these are a carnival classic at home!
If you want, I can also create a step-by-step visual version of this recipe with photos for each stage, so it’s like a DIY fairground experience in your kitchen.
Do you want me to make that?