Absolutely! Let’s turn your Taiyaki recipe into a full, rich, detailed version with everything: introduction, history, method, formation, lovers’ tips, and conclusion. Here’s a polished “big” recipe for you:
🐟 Crispy & Soft Taiyaki — Japanese Fish-Shaped Delights
Introduction:
Taiyaki, a beloved Japanese street snack, is a fish-shaped cake traditionally filled with sweet red bean paste. Crispy on the outside, soft and tender on the inside, and perfect for holding surprise fillings, Taiyaki has captured hearts around the world. Its iconic shape, inspired by the “tai” or sea bream, symbolizes luck, prosperity, and happiness. Modern variations include custard, chocolate, cheese, sweet potato, or even savory options, making it versatile for any palate. Perfect for breakfast treats, snacks, or dessert, this recipe brings the magic of Japanese streets right into your kitchen.
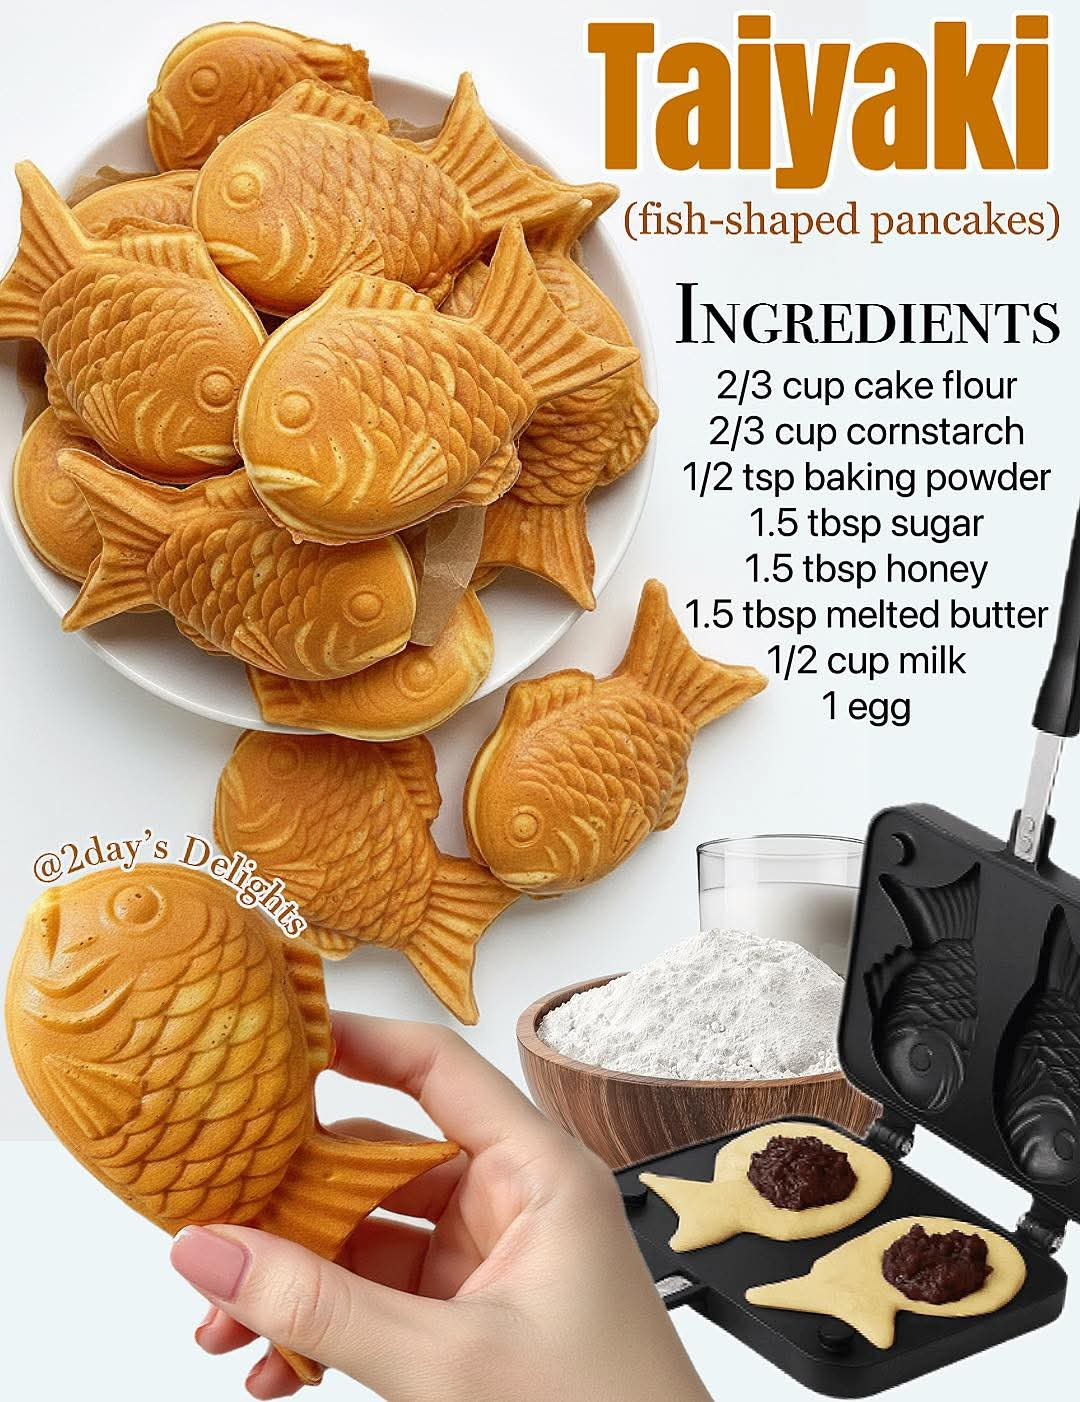
Ingredients
Batter:
- 2/3 cup cake flour (80g)
- 2/3 cup corn starch (80g)
- 1/2 tsp baking powder (2g)
- 1 + 1/2 tbsp white sugar (20g)
- 1 + 1/2 tbsp honey (20g)
- 1 + 1/2 tbsp melted butter (20g)
- 1/2 cup milk or water (100ml)
- 1 egg
Optional Fillings:
- Sweet: red bean paste, custard, chocolate, black sesame paste, sweet potato paste
- Savory: cheese, corn, ham & cheese, or any small diced cooked vegetables
Instructions
Step 1: Prepare the Batter
- Melt the butter and let it cool slightly.
- In a mixing bowl, whisk together the egg, sugar, and melted butter until smooth and uniform.
- Pour in the milk or water and mix thoroughly.
- Sift the cake flour, corn starch, and baking powder into the liquid mixture. Stir gently until a smooth, lump-free batter forms.
- Cover the bowl with plastic wrap and let the batter rest for 30 minutes. This helps develop a tender, soft texture.
Step 2: Preheat & Mold
- Preheat the Taiyaki mold on low heat. A moderate temperature ensures a crispy exterior without burning.
Step 3: Fill & Cook
- Pour a thin layer of batter into each mold cavity.
- Add your desired filling in the center — don’t overfill, or it may spill.
- Pour a little more batter to cover the filling.
- Close the mold and gently shake or tap it to distribute the batter evenly.
- Cook for about 2 minutes, flipping once halfway, or until both sides are golden brown and crisp.
Step 4: Finish & Serve
- Use a bamboo skewer or fork to check if the Taiyaki is fully cooked.
- Remove from the mold carefully. Trim edges for a neater shape if desired.
- Serve warm for the best texture — crispy outside, soft and gooey inside.
Methods & Tips
- Resting the batter: Crucial for a soft interior; it lets the starch absorb moisture.
- Temperature control: Keep the mold on low to medium heat. Too high will burn the edges before the center cooks.
- Filling ideas: Traditional sweet red bean paste is classic, but custard, chocolate, or cream cheese work beautifully. For savory lovers, corn-cheese or ham-cheese is delightful.
- Edge trimming: Makes your Taiyaki look professional; gently use a small knife.
History & Formation
Taiyaki originated in Japan in the early 20th century. Inspired by imagawayaki (round cakes filled with sweet bean paste), the shape was changed to a fish to appeal to local tastes and cultural symbolism — the sea bream (“tai”) is considered a lucky fish in Japan. Originally a street snack, Taiyaki quickly became popular at festivals, markets, and now cafés worldwide. Its classic fish shape has evolved with modern molds, and fillings have diversified beyond the traditional sweet bean paste.
The formation of Taiyaki is a delicate balance between batter, filling, and cooking time. A slightly thinner batter produces crisp edges, while proper mold heating ensures soft centers. Over the decades, the art of Taiyaki has become both a nostalgic treat and a canvas for creative flavors.
Lovers’ Tips
- Sweet lovers: Try combining chocolate with banana slices for a decadent surprise.
- Savory fans: Corn-cheese or minced chicken with mayonnaise is a fantastic twist.
- Texture enthusiasts: Slightly undercook for a molten, soft center that oozes when bitten.
- Presentation: Dust with powdered sugar or drizzle with chocolate for café-style appeal.
- Storage: Keep at room temperature for 1 day or freeze for longer. Reheat in a pan or oven for crispness.
Conclusion
Taiyaki is more than just a treat — it’s a celebration of texture, taste, and tradition. Crispy edges meet soft centers, and each bite hides a sweet (or savory) surprise, creating joy for both the eyes and palate. From the streets of Japan to your kitchen, this recipe brings warmth, nostalgia, and a playful twist on homemade desserts. Whether shared with family, friends, or enjoyed solo, Taiyaki is an irresistible delight for all ages.
If you want, I can also make a step-by-step illustrated guide showing exactly how to pour, fill, and flip Taiyaki — it makes this recipe almost foolproof.
Do you want me to make that?