Certainly! Here’s a full and detailed recipe for a chocolate cake inspired by your husband’s Mee Maw’s amazing baking skills, complete with an introduction, ingredients, instructions, history, and all the extra details you requested. Let’s dive into it!
Mee Maw’s Irresistible Chocolate Cake
Introduction: This decadent chocolate cake recipe comes straight from the heart of a family tradition. Known for her expert baking skills, Mee Maw’s chocolate cake was always the centerpiece at family gatherings, drawing everyone in with its rich aroma and melt-in-your-mouth texture. Even the staunchest chocolate skeptics couldn’t resist the allure of this cake. Whether it was for a birthday, holiday, or just a Sunday afternoon, her cake became a symbol of warmth and love.
What makes this cake so special isn’t just the flavor—it’s the care, history, and memories behind each ingredient. Let’s embark on a journey through generations and recreate a cake that will win over even the most reluctant chocolate eater.
Ingredients:
For the Cake:
- 2 cups all-purpose flour
- 2 cups granulated sugar
- 1/2 cup unsweetened cocoa powder (the good stuff!)
- 1 1/2 tsp baking powder
- 1 1/2 tsp baking soda
- 1 tsp salt
- 2 large eggs (room temperature)
- 1 cup whole milk
- 1/2 cup vegetable oil (or melted butter for extra richness)
- 2 tsp vanilla extract
- 1 cup boiling water (to create the perfect batter consistency)
For the Chocolate Frosting:
- 1/2 cup unsalted butter (softened)
- 1/2 cup unsweetened cocoa powder
- 4 cups powdered sugar (sifted)
- 1/4 cup whole milk
- 1 tsp vanilla extract
- Pinch of salt (to balance sweetness)
- Optional: 1/4 cup heavy cream for extra smoothness
Instructions:
For the Cake:
- Preheat the Oven: Preheat your oven to 350°F (175°C). Grease and flour two 9-inch round cake pans (or line with parchment paper) to ensure your cake doesn’t stick.
- Dry Ingredients: In a large mixing bowl, sift together the flour, sugar, cocoa powder, baking powder, baking soda, and salt. This will help eliminate lumps and ensure an even texture in your batter.
- Wet Ingredients: In a separate bowl, whisk the eggs, milk, vegetable oil, and vanilla extract until smooth. The mixture should be slightly thickened but pourable.
- Combine the Mixtures: Gradually add the wet ingredients into the dry ingredients and mix until well combined. The batter will be somewhat thick but very smooth. Be careful not to overmix.
- Add the Boiling Water: Carefully pour in the boiling water (it will make the batter thinner). Stir gently to incorporate. The batter will become runnier but that’s okay! It helps create the moist texture you’re after.
- Bake the Cake: Divide the batter evenly between the two prepared pans. Bake for 30-35 minutes, or until a toothpick inserted into the center comes out clean.
- Cool the Cakes: Let the cakes cool in the pans for 10 minutes before transferring them onto a wire rack to cool completely. Patience is key—don’t rush this step!
For the Frosting:
- Melt the Butter: In a medium-sized saucepan, melt the butter over medium heat. Add the cocoa powder and whisk until smooth.
- Add Milk and Vanilla: Stir in the milk and vanilla extract. Bring the mixture to a gentle simmer, stirring constantly to ensure everything is well-combined.
- Powdered Sugar: Gradually add the sifted powdered sugar, a little at a time, stirring to combine. If the frosting is too thick, you can add more milk (1 tbsp at a time) to achieve your desired consistency.
- Finish the Frosting: Once the frosting is smooth and glossy, remove from heat. Add a pinch of salt to balance the sweetness and adjust with extra cream if you prefer a smoother consistency.
Assembling the Cake:
- Frost the Layers: Once the cake layers have cooled, spread a generous amount of frosting on top of one layer. Place the second layer on top, then frost the entire cake, covering the top and sides. Use a spatula to smooth out the edges.
- Chill and Set: Let the cake set for about 30 minutes to allow the frosting to firm up. If you’re feeling fancy, you can add decorative touches like chocolate shavings or sprinkles.
History of Mee Maw’s Chocolate Cake:
This cake has been passed down through generations, each time with a little tweak or secret added to perfect it. The origins of this cake go back to the early 1900s, when Mee Maw’s great-grandmother made her first version using cocoa from the local mill. It was a simple recipe, often made to celebrate birthdays, holidays, or just when someone needed a pick-me-up.
Over time, family members began to appreciate the consistency of the cake’s texture, how each bite was moist and flavorful, with the frosting that had the perfect balance of sweetness and richness. Mee Maw, being the true matriarch of the family, preserved the tradition, and it became known as the “go-to” cake for every celebration.
Formation of the Cake:
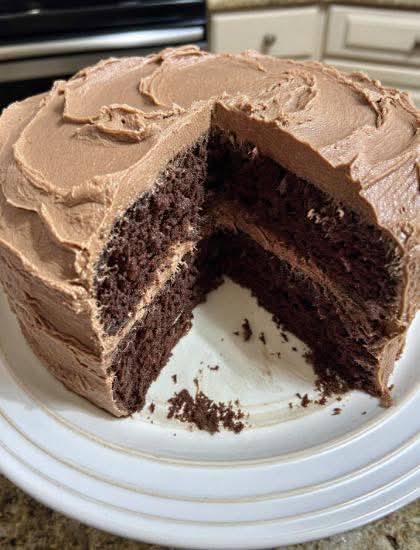
The beauty of this cake lies in its simplicity and balance. The slightly thinner batter, made by adding boiling water, contributes to the cake’s moist and light texture. The chocolate flavor is not overwhelming, allowing the sweetness of the frosting to balance the richness of the cocoa. This cake isn’t just food; it’s an experience—a comforting slice of nostalgia that brings the family together.
Lovers of the Cake:
It’s easy to see why this cake has such a devoted following. Even those who claim to not enjoy chocolate cake can’t resist Mee Maw’s creation. It’s rich but not too heavy, sweet but not cloying. Whether you enjoy it with a hot cup of coffee, a glass of milk, or just on its own, it’s a treat that captures the love and care of generations.
This chocolate cake is more than just dessert—it’s a piece of family history. And once you’ve tasted it, you’ll understand why it’s more than just a recipe—it’s a legacy.
Conclusion:
This cake is guaranteed to be a crowd-pleaser—whether it’s for a special occasion or simply to share with loved ones. It carries with it a sense of warmth and history that transforms every bite into a loving memory. So go ahead, make this cake, and let the taste take you back to simpler times, surrounded by family and laughter.
Enjoy your baking! Let me know if you need any tips or substitutions along the way!