Homemade Twix Bites Recipe: A Delicious Twist on a Classic Treat
Twix bars have been a popular candy for decades, offering a satisfying combination of a crunchy biscuit, creamy caramel, and a smooth chocolate coating. But what if you could make your own, with fewer ingredients and a fun bite-sized version? These Homemade Twix Bites are just the thing! Using a few simple ingredients like Nilla wafers, Rolos, and chocolate, you can create a treat that mimics the classic Twix bar, but in a super easy, bite-sized form. Whether you’re hosting a party, treating yourself, or looking for a quick homemade snack, this recipe is perfect!
History and Formation of Twix Bars
The Twix bar was first introduced in 1967 by Mars, Incorporated, under the name “Raider” in certain European countries. The name was changed to Twix in 1979, and the brand quickly became one of the most iconic candy bars worldwide. Twix’s distinct combination of a crunchy biscuit base, chewy caramel, and a milk chocolate coating became beloved by millions. Over the years, the Twix brand has expanded into various flavors and forms, but the original combination remains a favorite.
The idea of making your own Twix-inspired treat isn’t new, but the convenience and simplicity of these Homemade Twix Bites offer an extra layer of creativity and personal touch that store-bought candy simply can’t match. Plus, these bites are fun to make with kids or for a DIY snack night with friends. Let’s dive into the ingredients and the step-by-step instructions to make these bite-sized delights.
Ingredients
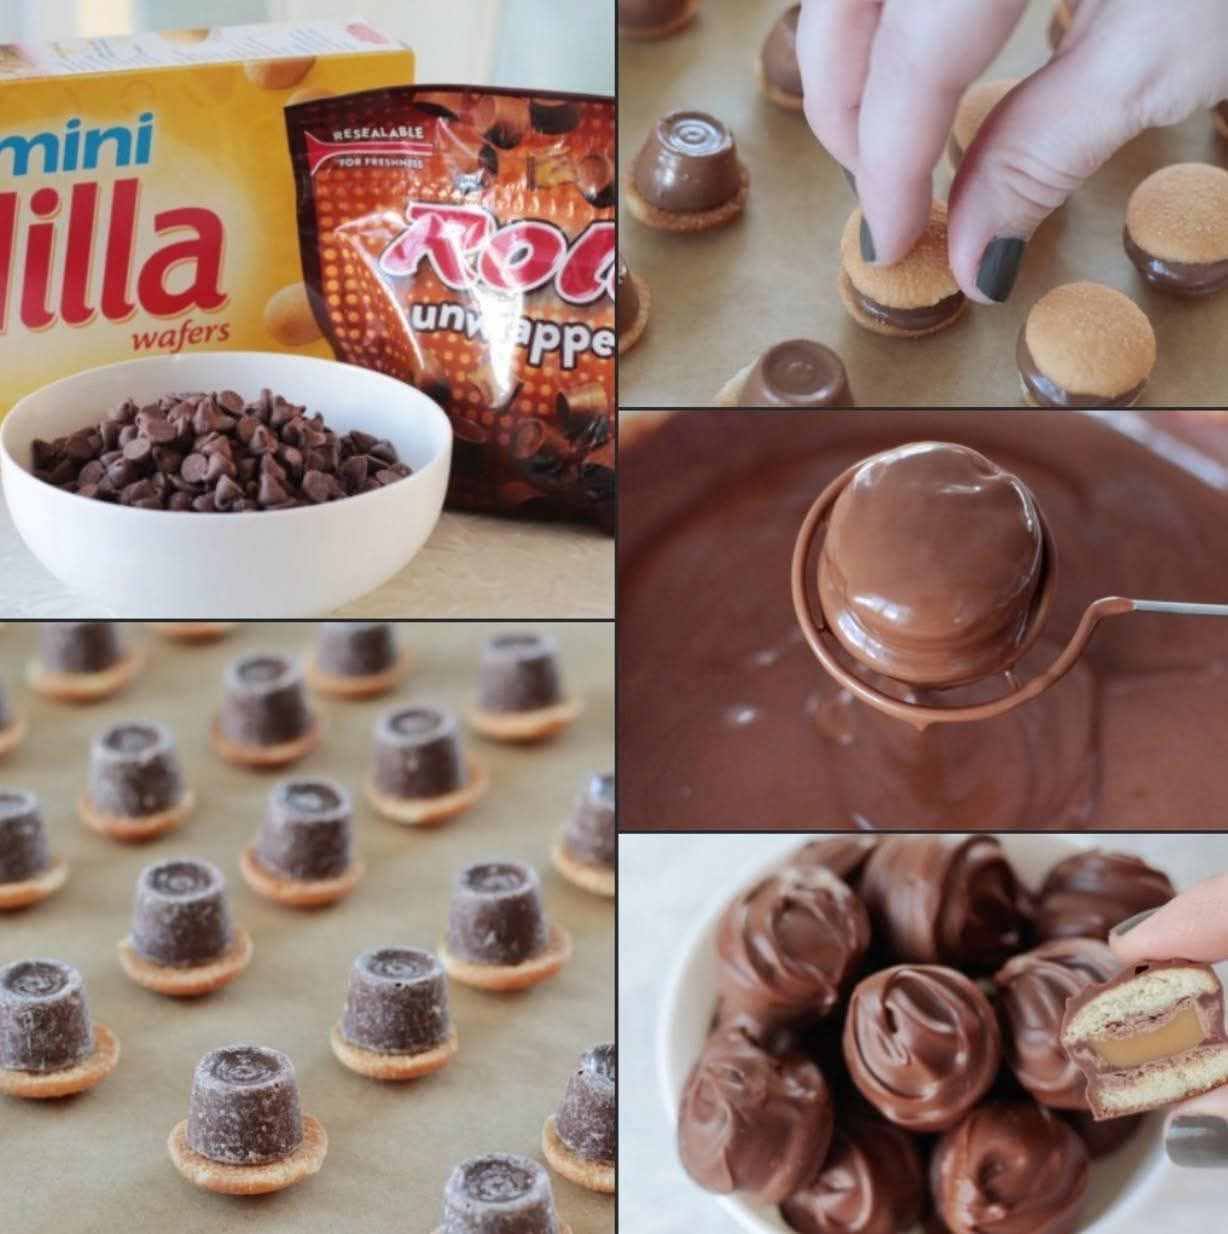
72 MINI Nilla Wafer cookies (about 36 sandwiches)
1 7-ounce bag of Rolos, unwrapped
8 ounces chocolate chips (milk or dark chocolate)
1 teaspoon coconut oil (optional, to help smooth the chocolate)
Instructions
1. Prepare Your Oven and Tray
Preheat your oven to 300°F (150°C).
Line a baking sheet with parchment paper for easy cleanup.
2. Assemble the Cookie Base
Lay out 36 mini Nilla wafer cookies on the baking sheet. These will serve as the base of each homemade Twix bite.
Place 1 Rolo candy in the center of each wafer cookie.
3. Bake and Soften the Caramel
Heat the baking sheet in the oven for 90 seconds. This will slightly soften the Rolo candies, making it easier to form the caramel layer. Do not bake longer than 90 seconds to avoid melting the Rolos too much. The goal is to soften them just enough for the next step.
4. Add the Top Cookie
Remove the tray from the oven. Place another Nilla wafer cookie on top of each softened Rolo candy. Gently press down, but do not squish the caramel too much—just enough to make a sandwich with the two cookies and the caramel in between.
Immediately place the tray in the refrigerator for about 15-20 minutes to cool and let the caramel set.
5. Melt the Chocolate Coating
While the cookies are chilling, melt your chocolate chips. You can either use a double boiler or microwave them in a microwave-safe bowl.
If you’d like to make the chocolate smoother and easier to work with, you can add 1 teaspoon of coconut oil while melting. This helps the chocolate coat more evenly and gives it a nice glossy finish.
6. Coat the Cookie Sandwiches
Once the cookies have chilled and the caramel has set, it’s time to dip them in chocolate.
Using a fork or a dipping tool, dip each cookie sandwich into the melted chocolate, making sure to coat it fully. Let any excess chocolate drip off by tapping the fork or tool gently against the side of the bowl.
Place the coated cookies back onto the parchment-lined baking sheet.
7. Chill to Set the Chocolate
Once all the cookies are coated in chocolate, return the tray to the refrigerator to allow the chocolate to harden. This should take about 15-20 minutes.
8. Serve and Enjoy
After the chocolate has hardened, your homemade Twix bites are ready to enjoy! Store them in an airtight container, and they should stay fresh for up to 2 weeks.
Methods and Techniques Used
The techniques in this recipe are relatively simple, focusing on making the most of the basic ingredients. The use of a softening method (heating the Rolos for 90 seconds) is key to getting that perfect balance between chewy caramel and crunchy biscuit. Chilling the cookies after assembling them helps set the caramel and prevents any mess when dipping in chocolate. The addition of coconut oil when melting the chocolate ensures a smooth, glossy finish.
The Lovers of Twix Bites
These homemade Twix bites will undoubtedly win over many fans. They appeal to lovers of classic candy bars, fans of quick and easy desserts, and those who appreciate the satisfying combo of crunchy, chewy, and chocolatey textures. These treats are perfect for a sweet tooth, ideal for those who love a DIY challenge, and absolutely irresistible for anyone who enjoys making homemade treats from scratch.
If you love the original Twix bar, you’ll adore these bite-sized homemade versions. They’re perfect for party platters, holiday treats, or just a simple indulgence during movie night. They also make great gifts for friends and family who appreciate a homemade touch.
Conclusion
Homemade Twix bites are the perfect fusion of simplicity and indulgence. With only a handful of ingredients, you can create a treat that tastes just as good (if not better) than the store-bought version. Whether you’re making them for a crowd or just for yourself, these bites are sure to bring smiles all around. The beauty of this recipe lies in its ease, creativity, and the rich, decadent flavor that makes each bite unforgettable.
So, the next time you’re craving something sweet, or want to impress guests with a fun, homemade treat, whip up a batch of these Homemade Twix Bites. They’re sure to be a hit!
—
Would you like any variations on this recipe or tips for making it even easier?