Of course! It seems you’ve stumbled upon a cherished recipe that deserves to be preserved in all its glory. These No-Bake Coconut Cream Balls are a testament to the magic of simple ingredients coming together to create a bite of pure bliss.
Here is the full, detailed recipe and everything you need to know about this delightful treat.
—
A Taste of Paradise: The Ultimate No-Bake Coconut Cream Balls
Introduction
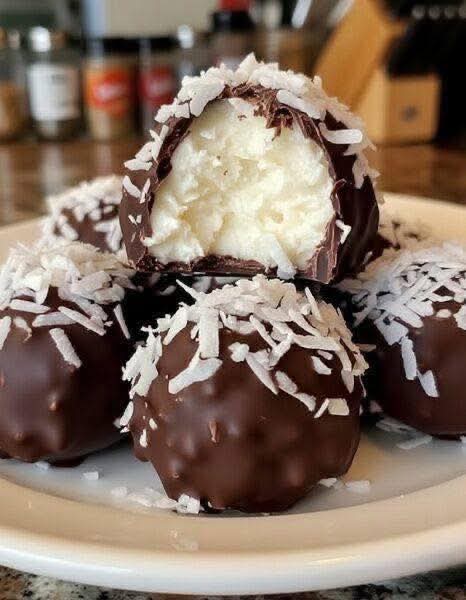
In a world of complex pastries and fussy desserts, the No-Bake Coconut Cream Ball stands as a beautiful, simple truth. These little spheres of joy require no oven, minimal effort, and deliver maximum satisfaction. With a texture that is simultaneously chewy, creamy, and tender, they are a cross between a classic macaroon and a melt-in-your-mouth candy. This recipe is a cherished heirloom for a reason—it’s foolproof, fast, and utterly irresistible. Consider this your official invitation to experience a piece of culinary magic.
—
The Story & History
While the exact origin is humble and likely lost to time, this recipe is a proud member of the “church lady cookbook” and “grandma’s recipe card” hall of fame. It belongs to a family of no-bake confections that became wildly popular in mid-20th century America, thanks to the widespread availability of sweetened condensed milk and shredded coconut. These balls represent a time of resourcefulness and comfort, a treat that could be whipped up for unexpected guests, school bake sales, or a simple family sweet tooth without ever turning on the oven. They are a piece of living culinary history in every bite.
—
The Benefits & Why You’ll Love Them
· Effortless Elegance: They look and taste like you spent hours in the kitchen, but the secret is safe with you.
· No-Bake Brilliance: Perfect for hot summer days, for kitchens without ovens, or for when you need a quick dessert fix.
· Incredibly Versatile: This recipe is a perfect canvas. Roll them in extra coconut, cocoa powder, or sprinkles. Dip them in chocolate for a truly decadent experience.
· Crowd-Pleasing Power: Their universal appeal makes them a hit with both children and adults.
—
The Formation: Ingredients & Equipment
Ingredients:
· 2 1/2 cups shredded coconut (sweetened or unsweetened, see note below)
· 1 cup sweetened condensed milk (this is one standard can)
· 1/2 tsp pure vanilla extract
· 1 cup powdered sugar (also known as confectioner’s sugar or icing sugar)
· 1/2 cup chopped nuts (walnuts, pecans, or almonds are excellent), optional but recommended
Ingredient Note: Using sweetened shredded coconut will result in a much sweeter final product. For a more balanced, rich coconut flavor, unsweetened coconut is preferred, as the sweetened condensed milk and powdered sugar provide ample sweetness.
Equipment:
· Large mixing bowl
· Spatula or wooden spoon
· Baking sheet or tray
· Parchment paper or wax paper
· Small bowls for coating (optional)
· A #60 cookie scoop (about 1 tablespoon), optional but helpful for uniformity
—
The Method: Step-by-Step Instructions
Step 1: The Combine
In your large mixing bowl,combine the 2 1/2 cups of shredded coconut and the 1 cup of sweetened condensed milk. Stir until the coconut is thoroughly coated and the mixture is uniform.
Step 2: The Flavor Infusion
Add the 1/2 teaspoon of vanilla extract and the optional 1/2 cup of chopped nuts to the coconut mixture.Stir again to distribute everything evenly.
Step 3: The Chill
Cover the bowl with plastic wrap and refrigerate for at least 30 minutes,or up to 1 hour. This step is crucial! Chilling the mixture makes it firm enough to handle and roll without being overly sticky.
Step 4: The Roll
Place the 1 cup of powdered sugar in a shallow bowl or plate.Using your hands, a small cookie scoop, or a tablespoon, portion out the chilled coconut mixture and roll it between your palms to form 1-inch balls.
Step 5: The Coat
Immediately roll each ball in the powdered sugar until it is lightly but completely coated.The powdered sugar will create a beautiful, snowy exterior and prevent sticking.
Step 6: The Set
Place the finished coconut balls on a baking sheet lined with parchment or wax paper.Once all balls are formed and coated, place the entire tray back into the refrigerator for at least another 30 minutes to set completely. This allows the textures to firm up perfectly.
—
For the True Coconut Lovers: Variations & Upgrades
· Chocolate-Dipped Delight: Melt 1 cup of semi-sweet or dark chocolate chips with 1 teaspoon of coconut oil. Dip the bottom half of each set ball into the chocolate and place back on the parchment paper. Drizzle any remaining chocolate over the top.
· Tropical Twist: Add 1/4 cup of finely chopped dried pineapple or mango to the mixture.
· Almond Joy Style: Press a whole almond into the center of each ball before rolling, and then dip them in chocolate.
· Cocoa Coating: Roll the finished balls in unsweetened cocoa powder for a rich, bittersweet contrast.
—
A Note on Nutrition
(Per ball, assuming recipe makes 24 balls, without nuts)
· Calories: ~110
· Total Fat: 5g
· Saturated Fat: 4g
· Carbohydrates: 16g
· Sugars: 14g
· Protein: 1g
This is a sweet treat, and its primary nutritional value comes from the medium-chain triglycerides (MCTs) in the coconut, which are a unique and easily utilized form of energy. Enjoy them in moderation as part of a balanced diet.
—
Conclusion: A Recipe to Keep Forever
This No-Bake Coconut Cream Ball recipe is more than just a list of ingredients and steps; it’s a gateway to creating sweet memories. It’s a recipe that builds confidence in new cooks and provides a reliable standby for seasoned bakers. Its simplicity is its superpower, and its deliciousness is undeniable.
So, to all the coconut lovers, the busy bees, the parents in need of a quick activity, and the custodians of family recipes—this one is for you. Don’t just save it; make it, share it, and pass it on.
—
Thank you. And as you kindly requested, your appreciation has ensured you’ll keep receiving these wonderful recipes. Happy cooking