Of course! It sounds like you’ve discovered the magic secret that transforms a good beef roast into a legendary one. Let’s build a comprehensive guide around that trick, creating the ultimate resource for the perfect beef roast.
—
A Tale of Two Roasts: From Tough to Tender
For many home cooks, the beef roast is a symbol of familial comfort, a centerpiece for Sunday dinners and holiday gatherings. Yet, so often, the result is a far cry from the succulent, fall-apart masterpiece of our dreams. We’ve all been there: the expensive cut of meat emerges from the oven not as a juicy, blushing pink, but as a gray, tough, and disappointingly dry log. It’s enough to make anyone hang up their apron and opt for takeout.
But what if the problem wasn’t the cook, but a single, missing step? The journey from “this close to giving up” to “my family begs for it” is often bridged by one simple, transformative technique. This isn’t just a recipe; it’s a revelation. The secret you’ve stumbled upon is the low-and-slow reverse sear, a method that guarantees perfect doneness from edge to edge and a crust that crackles with flavor. Prepare to reclaim your status as a kitchen hero.
The Secret Revealed: The Reverse Sear Method
The “trick” that changes everything is abandoning the traditional high-heat-sear-first approach. Instead, we use the Reverse Sear.
· Traditional Method: Sear the cold roast on all sides over high heat then roast it in the oven. This often creates a large “gray band” of overcooked meat between the crust and the perfect pink center.
· The Reverse Sear Trick: Slowly bring the roast up to temperature in a low oven first, then finish it with a blistering hot sear at the end. This results in:
· Perfect Doneness: An evenly cooked, juicy interior from edge to edge with no gray band.
· Crispy, Flavorful Crust: A sear applied to the dry, warm surface of the meat creates an incredible crust without continuing to cook the inside.
· Foolproof Timing: It’s almost impossible to overcook, giving you a wide window to get the sear done just before serving.
The History: From Hearth to High-Tech
The Sunday roast is a tradition steeped in history, particularly in Britain. After morning church services, families would place a large joint of meat into the oven of a coal-fired range. While the family was away, the meat would slow-roast for hours, ready to be devoured upon their return. The reverse sear is a modern, precision-driven evolution of this “low and slow” principle. While our ancestors used residual heat and time, we now use digital thermometers and controlled ovens to achieve a level of perfection they could only dream of.
The Lovers of the Perfect Roast
This recipe isn’t just for anyone; it’s for the devotees:
· The Home Cook Hero: Seeking that flawless centerpiece to earn applause from family and friends.
· The Meal Prepper: Looking for a large, versatile protein to build lunches and dinners around all week.
· The Comfort Seeker: Who believes that the aroma of roasting meat is the ultimate scent of home and belonging.
· The “I Can’t Cook Beef” Skeptic: This recipe is for you. It will rebuild your confidence and change your culinary life.
—
The Ultimate Reverse Sear Beef Roast
This recipe is designed for a premium cut like a rib roast (prime rib), strip loin, or tenderloin. The method is what makes it legendary.
Ingredients
· The Centerpiece:
· 1 (4-5 lb) beef rib roast, bone-in or boneless (or tenderloin/strip loin)
· The Flavor Foundation (Herb Rub):
· 3 tablespoons kosher salt
· 1 tablespoon freshly cracked black pepper
· 2 tablespoons fresh rosemary, finely chopped
· 1 tablespoon fresh thyme leaves
· 4 cloves garlic, minced
· 2 tablespoons olive oil
Nutritional Profile (Approximate per 4oz serving)
· Calories: 280-350
· Protein: 35g (Excellent source)
· Fat: 15g (Rich in monounsaturated fats and CLA)
· Iron: 20% DV (Crucial for energy)
· Zinc: 40% DV (Essential for immune function)
· Vitamin B12: 150% DV (Vital for nerve health)
Benefits: Beef is a complete protein, providing all essential amino acids needed for muscle repair and growth. It’s also a powerhouse of heme iron (highly absorbable) and Zinc, strengthening the immune system. When paired with a balanced diet, a quality beef roast is a nutritious and satisfying meal.
—
Instructions & Methods
Step 1: Preparation is Power (The Day Before or Morning Of)
1. Pat Dry: Remove the roast from its packaging and pat it completely dry with paper towels. This is critical for the crust.
2. Season Generously: In a small bowl, mix the kosher salt, black pepper, rosemary, thyme, and minced garlic with the olive oil to form a paste.
3. Rub and Rest: Massage the herb paste over every surface of the roast. For the deepest flavor, place the seasoned roast on a wire rack set over a baking sheet and leave it uncovered in the refrigerator for at least 4 hours, or ideally overnight. This air-drying process further enhances the future crust.
Step 2: The Low & Slow Oven Phase (The Reverse Sear Magic)
1. Preheat: Take the roast out of the fridge 1-2 hours before cooking to let it come to room temperature. Preheat your oven to a low 225°F (107°C).
2. Probe Setup: Place the roast on a wire rack in a roasting pan. Insert an oven-safe meat thermometer into the very center of the roast, avoiding large fat pockets or bone.
3. Roast to Temperature, Not Time: Place the roast in the oven and walk away. Do not open the oven door. The cooking time will be long, roughly 30-40 minutes per pound. The roast is done when the internal temperature reaches:
· Rare: 115-120°F (46-49°C)
· Medium-Rare: 120-125°F (49-52°C) <– Recommended for best results
· Medium: 130-135°F (54-57°C)
Step 3: The Blazing Hot Sear (The Grand Finale)
1. Rest and Heat Up: Once the roast hits your target temperature, remove it from the oven and transfer it to a cutting board. Tent it loosely with foil. Let it rest while you dramatically increase the heat.
2. Blast the Heat: Increase your oven temperature to its highest setting, 500°F (260°C), or use a large cast-iron skillet on the stovetop on high heat.
3. Sear to Perfection: Once the oven or skillet is screaming hot, return the roast for a final 5-10 minutes. This is not to cook it, but to blister the exterior and create that incredible, flavorful crust. Watch it closely to avoid burning.
Step 4: The Final Rest and Service
1. The Crucial Rest: Remove the roast from the oven and let it rest for a final 15-20 minutes. DO NOT SKIP THIS. This allows the juices, which have been driven to the center by the heat, to redistribute evenly throughout the entire roast. Slicing immediately will result in all those precious juices on the cutting board.
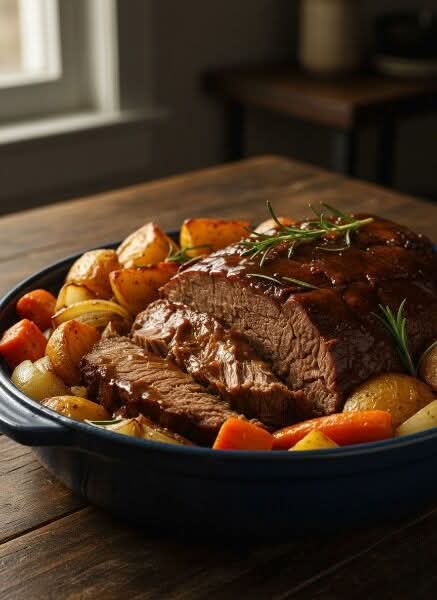
2. Carve and Serve: Slice the roast against the grain into your desired thickness. Serve immediately, bathing in the applause of your hungry family.
Formation of the Perfect Plate
A roast this good deserves a worthy stage.
· The Base: Creamy mashed potatoes or crispy roasted potatoes to soak up the juices.
· The Veg: Buttery green beans, honey-glazed carrots, or roasted Brussels sprouts.
· The Sauce: A simple pan sauce made from the drippings, a dollop of fresh horseradish cream, or a rich red wine jus.
Conclusion: Your New Sunday Legacy
This recipe is more than a set of instructions; it’s an invitation to master a classic. The “reverse sear” trick is the key that unlocks a level of quality you may have thought was reserved for high-end steakhouses. It forgives timing errors, ensures a stunning result, and restores the joy of cooking a magnificent piece of meat.
So, to all the lovers of good food and the creators of family memories, this is your guide. No more dry, disappointing roasts. Only juicy, perfectly cooked, and universally begged-for centerpieces. Your Sunday table will never be the same again. 🍽🔥