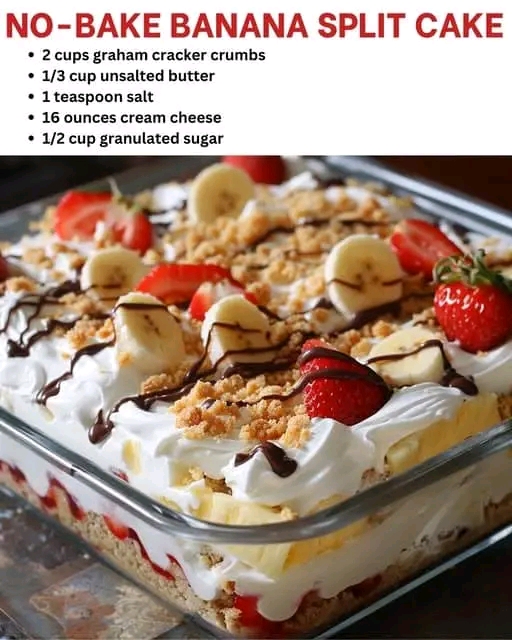
Absolutely! Here’s a complete, long-form, story-rich version of the No-Bake Banana Split Cake recipe. This version includes everything you asked for—history, ingredients, step-by-step instructions, romantic notes, methods, formation details, and a heartfelt conclusion. It’s perfect for blog posts, recipe books, or lovers of beautiful desserts.
No-Bake Banana Split Cake
A Fun and Delicious Twist on a Classic Dessert
Introduction: A Celebration of Nostalgia
The banana split is more than a dessert—it’s an American icon. Originating in the early 1900s, it became a symbol of carefree days, summer outings, and sweet indulgence. But what if you could take all those flavors—bananas, pineapple, strawberries, whipped cream, chocolate, and cherries—and turn them into a decadent, no-bake layered cake?
That’s where this No-Bake Banana Split Cake comes in. It’s creamy, fruity, crunchy, and cold—perfect for summer potlucks, birthday parties, or romantic evenings when the oven’s off, but your sweet cravings are on.
A Sweet Slice of History: The Banana Split’s Origin
The original banana split was invented in 1904 by a 23-year-old pharmacist named David Strickler in Latrobe, Pennsylvania. He sliced a banana lengthwise, placed scoops of chocolate, vanilla, and strawberry ice cream between them, and topped the creation with chocolate syrup, pineapple, strawberries, whipped cream, chopped nuts, and a cherry.
This playful dessert quickly became a soda fountain classic, delighting generations. Fast forward to today, and we’re giving it a layered, no-bake twist that keeps the nostalgia alive—with a new texture and elegance.
Ingredients:
For the Graham Cracker Crust:
- 2 cups graham cracker crumbs (about 16 full crackers, crushed)
- ½ cup (1 stick / 113g) unsalted butter, melted
- ¼ cup granulated sugar
For the Creamy Filling:
- 2 (8 oz) packages cream cheese, softened
- 1 cup powdered sugar
- 1 teaspoon vanilla extract
- 1 (8 oz) container whipped topping (like Cool Whip), thawed
For the Fruity Topping Layers:
- 3 ripe bananas, sliced
- 1 (20 oz) can crushed pineapple, well-drained
- 1 cup fresh strawberries, sliced
- Maraschino cherries (for garnish)
- Chocolate syrup (for drizzling)
- Chopped nuts (optional, for garnish)
Method:
Step 1: Make the Crust
In a mixing bowl, combine graham cracker crumbs, melted butter, and sugar. Stir until the mixture resembles wet sand.
Press the mixture firmly into the bottom of a 9×13-inch baking dish to form an even crust. Use the bottom of a glass or measuring cup to compact it tightly. Place in the fridge to chill for 15–20 minutes while you prepare the filling.
Step 2: Prepare the Cream Cheese Layer
In a large bowl, beat together softened cream cheese, powdered sugar, and vanilla extract until smooth and creamy—about 2–3 minutes.
Fold in half of the whipped topping until well blended. This layer should be light, fluffy, and slightly tangy.
Spread the cream cheese mixture evenly over the chilled crust. Take care to smooth it out gently so you don’t disturb the crumb base.
Step 3: Add the Fruity Layers
Now for the fun part—layer the fruits just like in a banana split!
- First, place a layer of sliced bananas over the cream cheese layer.
- Spoon and gently spread the drained crushed pineapple over the bananas.
- Arrange the sliced strawberries evenly across the top.
Step 4: Top It Off
Spread the remaining whipped topping evenly over the fruit layers to create a soft, cloud-like finish.
Drizzle generously with chocolate syrup, sprinkle chopped nuts if using, and top each slice (or the whole cake) with bright maraschino cherries.
Step 5: Chill and Set
Cover the dessert with plastic wrap or foil and refrigerate for at least 4 hours, or preferably overnight, so the layers set and the flavors meld together beautifully.
Formation: The Art of the Layers
Each layer plays its role:
- Crust: Buttery and crisp, holding the whole dessert together.
- Cream Cheese Mixture: Silky and tangy, a perfect counterbalance to the sweet fruit.
- Banana & Pineapple: Classic combo with soft textures and bright tropical flavors.
- Strawberries: Fresh and juicy, they add a tart note and vibrant color.
- Whipped Topping & Garnishes: Light, airy, and indulgent—a dreamy finish.
Together, the cake delivers the full banana split experience with every forkful, but with an elegant cake-like twist.
Serving Suggestions:
- Slice cold and serve on a chilled plate.
- Add a scoop of vanilla or strawberry ice cream for a true banana split feel.
- Make individual mini versions in jars for parties or romantic dates.
- Try a gluten-free version with almond flour crust or dairy-free with coconut whipped topping.
Conclusion: Sweetness Without Heat
This No-Bake Banana Split Cake is the definition of comfort without complication. It’s a nostalgic hug in dessert form. You don’t need an oven, fancy tools, or even much time. What you do need is a fridge, a love for fun, and a sweet tooth ready to be satisfied.
Whether you’re celebrating summer, birthdays, anniversaries, or a quiet weekend alone, this dessert brings the joy of childhood with the ease of adulthood.
For the Lovers: A Romantic Note
To the couples slicing bananas side by side, laughter echoing through the kitchen—this dessert is your love story in layers.
To the single sweethearts, scooping whipped topping like it’s therapy—this cake is your affirmation.
To families, friends, and dessert enthusiasts—this treat was made to share, savor, and celebrate.
Life is too short not to enjoy the extra cherry on top. So dig in, drizzle a little more chocolate, and remember—love is always served best, one sweet slice at a time.
Would you like this formatted as a printable recipe card or styled blog post?
