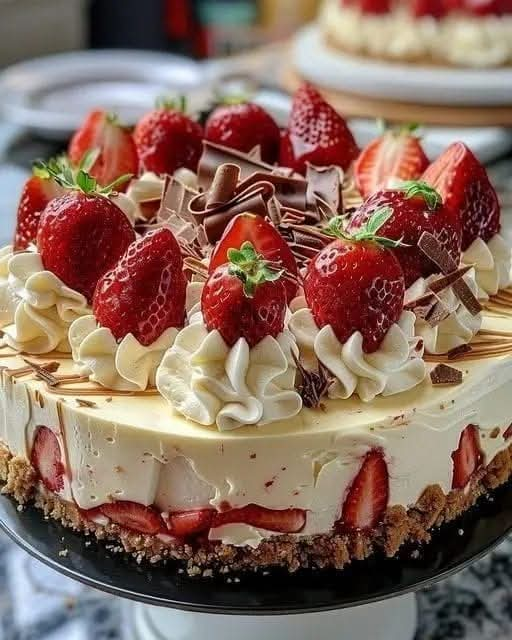
Here’s a detailed recipe for White Chocolate Strawberry Cheesecake, including its history, ingredients, preparation steps, and serving suggestions.
White Chocolate Strawberry Cheesecake
Introduction
White Chocolate Strawberry Cheesecake is a rich, creamy, and indulgent dessert that perfectly combines the sweetness of white chocolate with the fresh tartness of strawberries. Cheesecake has been enjoyed for centuries, dating back to Ancient Greece, but modern versions evolved in the United States with the introduction of cream cheese. This variation highlights the luxurious pairing of velvety white chocolate and juicy strawberries, making it a favorite for celebrations, romantic occasions, and sweet cravings.
Ingredients
For the Crust
- 2 cups (200g) graham cracker crumbs or digestive biscuits, crushed
- 1/3 cup (80g) unsalted butter, melted
- 2 tbsp granulated sugar
For the Cheesecake Filling
- 16 oz (450g) cream cheese, softened
- 1 cup (200g) granulated sugar
- 3 large eggs
- 1 tsp vanilla extract
- 1 cup (240ml) heavy whipping cream
- 8 oz (225g) white chocolate, melted and slightly cooled
For the Strawberry Swirl or Topping
- 2 cups (300g) fresh strawberries, chopped
- 1/3 cup (70g) granulated sugar
- 1 tbsp lemon juice
- 1 tbsp cornstarch mixed with 2 tbsp water
Instructions
Step 1: Preparing the Crust
- Preheat your oven to 325°F (160°C).
- In a bowl, combine graham cracker crumbs, melted butter, and sugar. Mix until the texture is like wet sand.
- Press the mixture into the bottom of a 9-inch (23cm) springform pan, ensuring an even layer.
- Bake for 8-10 minutes, then remove and let it cool.
Step 2: Making the Strawberry Sauce
- In a saucepan over medium heat, combine chopped strawberries, sugar, and lemon juice. Stir frequently until strawberries soften.
- Add the cornstarch mixture and continue stirring until the sauce thickens. Remove from heat and let it cool.
Step 3: Preparing the Cheesecake Filling
- In a large mixing bowl, beat softened cream cheese until smooth.
- Gradually add sugar and continue mixing.
- Add eggs one at a time, mixing after each addition.
- Stir in vanilla extract.
- Gently fold in melted white chocolate and mix until fully incorporated.
- Pour the batter over the cooled crust in the springform pan.
Step 4: Adding the Strawberry Swirl
- Drop spoonfuls of strawberry sauce over the cheesecake batter.
- Use a toothpick or knife to swirl the sauce into the cheesecake for a marbled effect.
Step 5: Baking the Cheesecake
- Place the cheesecake pan in a water bath (wrap the bottom in foil and set it inside a larger pan with hot water).
- Bake for 55-65 minutes, or until the center is slightly jiggly but mostly set.
- Turn off the oven, crack the door, and let the cheesecake cool inside for 1 hour.
Step 6: Chilling and Serving
- Refrigerate the cheesecake for at least 6 hours or overnight for best results.
- Before serving, top with extra fresh strawberries and white chocolate shavings.
History of Cheesecake
Cheesecake dates back to Ancient Greece, where it was made with cheese, honey, and wheat. The modern version evolved in the 19th century when cream cheese became a staple ingredient. White chocolate, introduced in the 20th century, elevated the dessert by adding a creamy sweetness that pairs beautifully with fruit like strawberries.
Why You’ll Love This Cheesecake
✔ Rich & Creamy Texture – The combination of cream cheese and white chocolate makes it silky smooth.
✔ Perfectly Balanced Flavor – The sweetness of white chocolate contrasts with the tanginess of strawberries.
✔ Elegant Presentation – A beautiful marbled top makes it ideal for special occasions.
✔ Make-Ahead Friendly – This cheesecake gets better as it chills overnight.
Serving & Storage Tips
- Serve chilled with a drizzle of extra strawberry sauce.
- Store in an airtight container in the refrigerator for up to 5 days.
- Freeze individual slices for up to 3 months; thaw overnight before eating.
Conclusion
White Chocolate Strawberry Cheesecake is a masterpiece of flavors and textures. Whether you’re making it for a birthday, anniversary, or just because, it’s guaranteed to impress. Try this recipe, and let every bite melt in your mouth!
Would you like any variations or additional tips?
