Sure! Here’s an expanded, detailed version of your No-Bake Banana Split Cake Recipe with everything you requested:
No-Bake Banana Split Cake: A Nostalgic and Delightful Dessert!
Introduction:
The banana split is a beloved dessert that has delighted sweet tooths for over a century. Traditionally served in a long dish with scoops of ice cream, bananas, and toppings galore, this treat has a timeless charm. Our recipe takes the flavors of the classic banana split and transforms it into a no-bake cake, perfect for parties, celebrations, or even a cozy night in with loved ones. This easy-to-make dessert combines creamy layers, fresh fruit, and decadent toppings into one irresistible treat. Let’s dive in and make a dessert that’s as much fun to create as it is to eat!
Ingredients
For the Crust:
- 2 cups graham cracker crumbs
- 1/2 cup unsalted butter, melted
- 1/4 cup granulated sugar
For the Filling:
- 2 (8 oz) packages cream cheese, softened
- 1 cup powdered sugar
- 1 teaspoon vanilla extract
- 1 (8 oz) container frozen whipped topping, thawed
For the Toppings:
- 3 ripe bananas, sliced
- 1 (20 oz) can crushed pineapple, drained
- 1 cup strawberries, sliced
- Maraschino cherries, for garnish
- Chocolate syrup, for drizzling
- Chopped nuts, for garnish (optional)
Instructions
Step 1: Prepare the Crust
- In a mixing bowl, combine the graham cracker crumbs, melted butter, and granulated sugar. Mix until the crumbs are evenly coated and resemble wet sand.
- Press the mixture firmly into the bottom of a 9×13-inch pan to create an even crust. Refrigerate the crust for about 20 minutes to set.
Step 2: Make the Filling
- In a large mixing bowl, beat the softened cream cheese, powdered sugar, and vanilla extract until smooth and creamy.
- Gently fold in the thawed whipped topping until fully combined. This will create a light and fluffy filling.
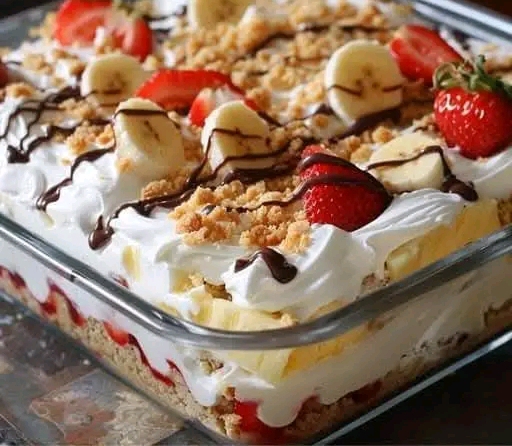
Step 3: Assemble the Cake
- Spread the cream cheese mixture evenly over the chilled crust.
- Layer the banana slices over the cream cheese filling, ensuring even coverage.
- Spread the drained crushed pineapple over the bananas, followed by the sliced strawberries.
Step 4: Add the Toppings
- Drizzle chocolate syrup generously over the fruit layers.
- Sprinkle chopped nuts for added crunch (optional).
- Garnish with maraschino cherries for that classic banana split look.
Step 5: Chill and Serve
- Cover the pan with plastic wrap or foil and refrigerate for at least 4 hours, or overnight, to allow the flavors to meld and the cake to set.
- Once chilled, slice into squares and serve.
A Brief History of the Banana Split
The banana split was invented in 1904 by David Strickler, a pharmacy apprentice in Latrobe, Pennsylvania. His innovation of slicing a banana lengthwise and pairing it with ice cream, syrup, and cherries became an instant hit. Over time, the dessert evolved, spawning variations and inspiring recipes like this no-bake banana split cake.
Why You’ll Love This Recipe
- No Oven Required: Perfect for hot days or when you don’t feel like baking.
- Versatile: You can swap out fruits or toppings to suit your taste.
- Crowd-Pleaser: A hit at family gatherings, potlucks, or birthdays.
- Easy to Make: Minimal prep with maximum flavor.
Pro Tips for the Perfect Banana Split Cake
- Prevent Banana Browning: Toss the banana slices in lemon juice before layering to keep them fresh and vibrant.
- Customize Your Layers: Add a layer of pudding or caramel for an extra touch of indulgence.
- Nut-Free Option: Skip the nuts if serving those with allergies or preferences.
Conclusion
This no-bake banana split cake is the ultimate combination of fun, flavor, and nostalgia. Whether you’re sharing it with friends, family, or just indulging in a slice on your own, it’s bound to bring joy with every bite. Easy to make and endlessly customizable, this dessert is a modern twist on a timeless classic that will have everyone coming back for seconds.
Thank you for sharing your kitchen with this recipe! If you try it, let me know how much you love it. Happy no-baking!