Here’s a complete guide to making shaped chocolate chip cookies using silicone molds, complete with a detailed recipe, history, and techniques for cookie lovers.
Shaped Chocolate Chip Cookies: A Sweet Twist on a Classic Treat
Chocolate chip cookies are an all-time favorite, originating from the 1930s when Ruth Wakefield, owner of the Toll House Inn, accidentally invented them. These cookies quickly became a staple dessert, known for their chewy texture and gooey chocolate chips. Today, we’re giving this timeless recipe a fun makeover by using silicone molds to create shaped cookies—perfect for parties, holidays, or just to impress your loved ones.
Ingredients
For about 12 shaped cookies (depending on mold size):
Dry Ingredients:
2 ¼ cups (280g) all-purpose flour
½ teaspoon baking soda
½ teaspoon baking powder
½ teaspoon salt
Wet Ingredients:
¾ cup (170g) unsalted butter, melted and slightly cooled
1 cup (200g) packed brown sugar
½ cup (100g) granulated sugar
1 large egg
1 large egg yolk
2 teaspoons pure vanilla extract
Mix-ins:
1 ½ cups (260g) semi-sweet chocolate chips or chunks
Optional: ½ cup chopped nuts (e.g., walnuts or pecans)
Instructions
Step 1: Prepare Your Mold
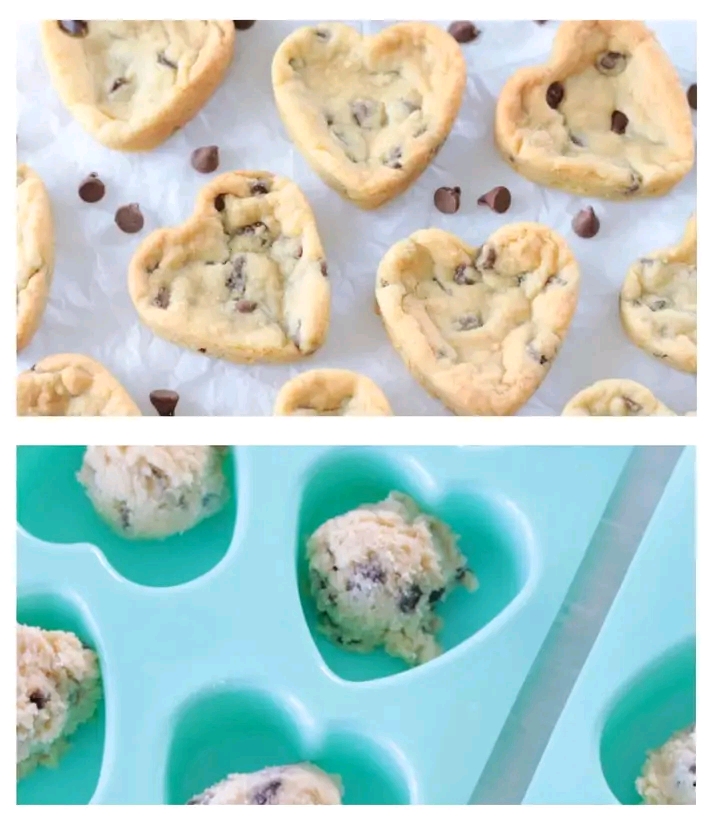
- Choose silicone molds in your desired shapes (hearts, flowers, stars, etc.).
- Lightly grease the molds with cooking spray or butter to ensure easy removal.
- Preheat your oven to 350°F (175°C) and set your molds on a sturdy baking tray.
Step 2: Mix the Dough
- In a medium bowl, whisk together the dry ingredients: flour, baking soda, baking powder, and salt. Set aside.
- In a large mixing bowl, combine the melted butter, brown sugar, and granulated sugar. Whisk until smooth and creamy.
- Add the egg, egg yolk, and vanilla extract to the wet mixture, whisking until fully incorporated.
- Gradually add the dry ingredients to the wet ingredients. Stir gently with a spatula until just combined.
- Fold in the chocolate chips (and nuts, if using).
Step 3: Fill the Silicone Molds
- Using a spoon or small cookie scoop, fill each silicone mold cavity about ¾ full with cookie dough. Avoid overfilling to prevent spillage during baking.
- Tap the baking tray lightly on the counter to settle the dough.
Step 4: Bake
- Place the tray with molds into the preheated oven and bake for 12–15 minutes, or until the edges are lightly golden and the centers are set.
- Allow the cookies to cool in the molds completely before attempting to remove them.
Step 5: Release and Serve
- Once cooled, use a butter knife to gently loosen the edges of the cookies. They should pop out easily.
- Serve as is or decorate with icing, sprinkles, or melted chocolate for added flair.
Tips for Success
- Chilling the Dough: For crisper edges and defined shapes, chill the cookie dough in the molds for 10–15 minutes before baking.
- Choosing the Right Recipe: This recipe works great for molds, but avoid overly soft doughs (like those for chewy cookies) that may lose their shape.
For Cookie Lovers
Cookie lovers rejoice! Shaped chocolate chip cookies are not just delicious—they’re also a fun way to show your creativity. Gift them to loved ones, use them as party favors, or make them as a delightful treat for yourself.
Did you know? Chocolate chip cookies are so beloved that August 4th is celebrated as National Chocolate Chip Cookie Day. Why not elevate the celebration with shaped cookies?
Conclusion
Shaped chocolate chip cookies bring a playful twist to a beloved classic. By using silicone molds, you can create visually stunning cookies that taste just as good as they look. Whether you’re an experienced baker or a newbie in the kitchen, this recipe is sure to delight. Happy baking!