Here’s a detailed recipe and narrative for Winter Forest Painted Cake, incorporating its background, ingredients, methods, and its appeal to cake lovers.
Winter Forest Painted Cake
Introduction
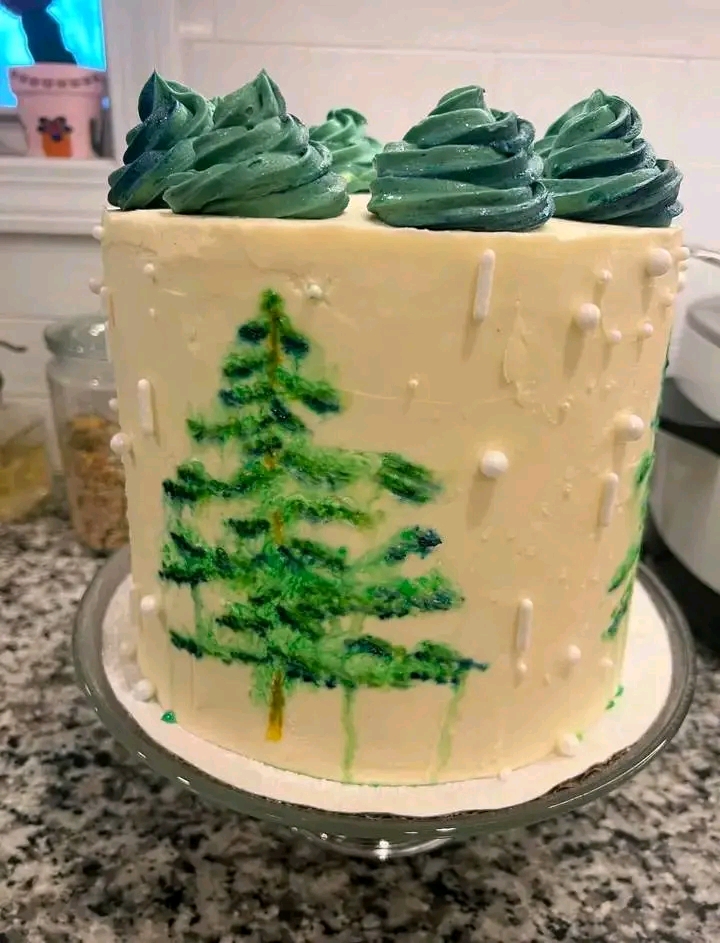
The Winter Forest Painted Cake is a masterpiece of culinary art that brings the beauty of a snow-draped forest to your table. This cake combines a velvety vanilla sponge with creamy buttercream frosting, artistically painted to mimic winter trees. It’s perfect for winter holidays, family gatherings, or any occasion that celebrates the serene beauty of the colder season.
The History Behind the Cake
Decorated cakes have a long history, originating from the European Renaissance when cakes became a medium for artistic expression. Modern hand-painted cakes reflect this tradition, with designs often inspired by nature. The Winter Forest Painted Cake channels the calm and magic of winter landscapes, turning a simple dessert into a seasonal centerpiece.
Ingredients
For the Cake:
2 ½ cups all-purpose flour
2 ½ tsp baking powder
½ tsp salt
1 cup unsalted butter, softened
2 cups granulated sugar
4 large eggs
2 tsp pure vanilla extract
1 cup whole milk
For the Buttercream Frosting:
1 ½ cups unsalted butter, softened
4 cups powdered sugar, sifted
2 tsp vanilla extract
2–4 tbsp heavy cream or milk
Gel food coloring (green, blue, yellow, white for painting)
For the Decoration:
Small paintbrushes (food-safe)
Edible pearls or sugar beads (optional for snow effect)
Methods
Preparing the Cake:
- Preheat your oven to 350°F (175°C) and grease three 8-inch round cake pans. Line the bottoms with parchment paper for easy release.
- In a bowl, sift together the flour, baking powder, and salt. Set aside.
- Cream the butter and sugar in a large bowl until light and fluffy, about 3 minutes.
- Add the eggs, one at a time, beating well after each addition. Stir in the vanilla extract.
- Gradually mix in the dry ingredients, alternating with milk. Begin and end with the dry ingredients.
- Divide the batter evenly among the prepared pans and bake for 25–30 minutes, or until a toothpick inserted in the center comes out clean.
- Allow the cakes to cool in the pans for 10 minutes, then transfer them to a wire rack to cool completely.
Making the Buttercream Frosting:
- Beat the butter until smooth and creamy.
- Gradually add the powdered sugar, one cup at a time, mixing well.
- Add vanilla extract and 2 tablespoons of cream or milk. Adjust the consistency with more cream if needed.
Assembling and Decorating:
- Spread a thin layer of buttercream between each cake layer and stack them evenly. Cover the entire cake with a smooth crumb coat and refrigerate for 20 minutes.
- Apply a final, smooth layer of buttercream, ensuring the surface is even.
- Using gel food colors and a food-safe paintbrush, paint tree shapes around the cake. Start with darker green shades for depth and add lighter strokes for detail.
- Add edible pearls or dots of white frosting for a snowy effect. Create frosting swirls on top to mimic treetops.
Why Cake Lovers Adore It
The Winter Forest Painted Cake is adored for its:
Aesthetic appeal: A stunning centerpiece for winter celebrations.
Flavors: The balance of fluffy sponge and creamy frosting.
Personalization: The hand-painted design lets bakers showcase their creativity.
Formation and Artistic Touch
This cake’s charm lies in its formation. Painting the buttercream surface requires patience and imagination. With each tree added, the cake transforms into an edible winter wonderland. It’s more than just a dessert; it’s a piece of art.
Conclusion
The Winter Forest Painted Cake combines taste and elegance, making it a dessert that’s not just consumed but admired. Whether you’re a seasoned baker or a beginner, crafting this cake will leave you with a sense of accomplishment. Share it with loved ones, and watch their faces light up at its beauty.
